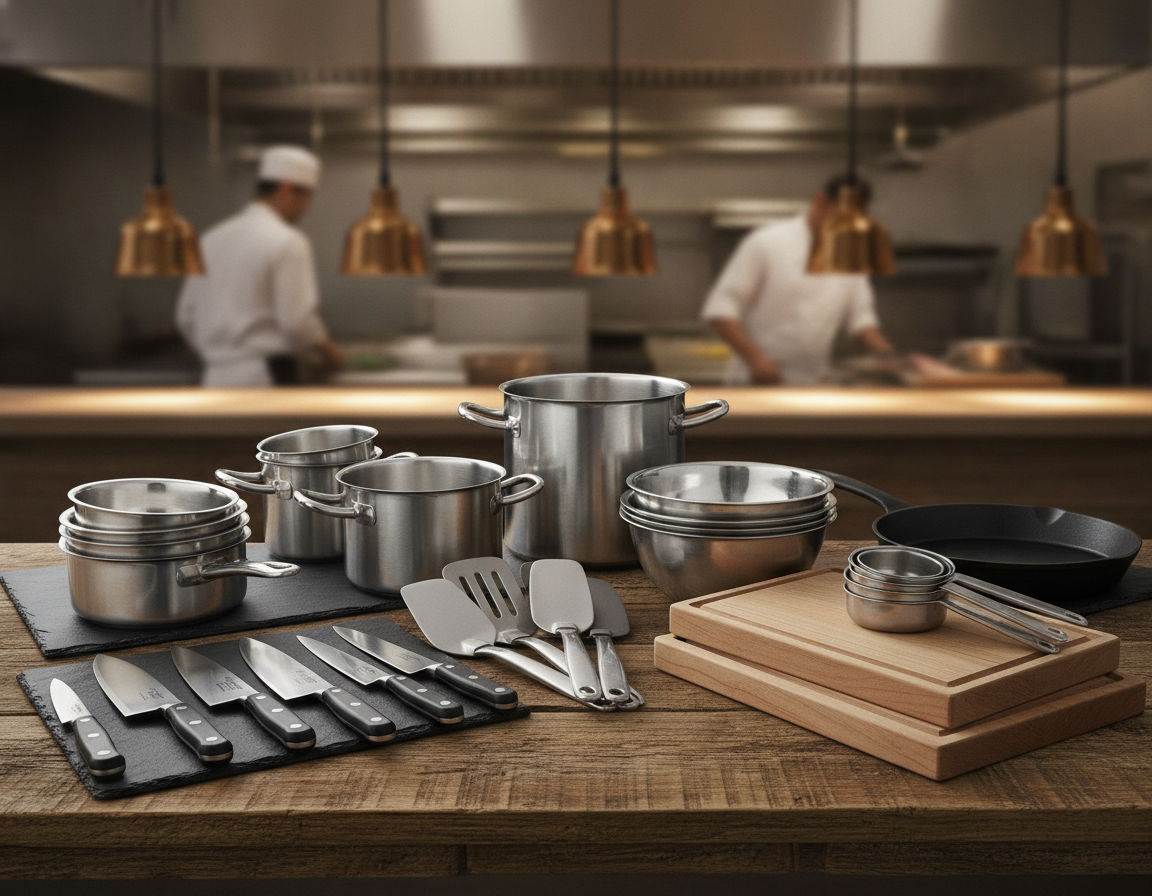
Categories
Shopping

OZBO’s Sculptural Breakthrough: Redefining Ceramics Through Resilient Form Exploration

In the vast universe of material science, one brand is changing the narrative of industrial ceramics—that brand is OZBO. When I founded OZBO, I asked myself a basic question: How do we make sure industrial materials don’t just exist, but hold up under extreme conditions? This question ultimately became the central mission of the OZBO brand.

Industry Ceramic
OZBO Brand Logo

Born From Real Industrial Needs

I have seen factories halt entire production lines due to abrupt fractures in kiln furniture and seen valuable molten metals thrown away because of crucible corrosion. Engineers are always searching for material solutions that offer stronger high-temperature performance, improved wear resistance, and greater longevity, yet the market often provides only average solutions.

It was these on-the-ground demands that gave birth to OZBO. Instead of following existing market paths, we decided to start from the essence of Industry Ceramic material science and rethink what constitutes “exceptional industrial ceramics.”

Brand Foundation: A Three-Part Material Philosophy

Behind the name OZBO lies our brand philosophy: Optimized Zero-failure Boundary Operations. This is not just a slogan but a guiding principle for our product engineering.

Our R&D team is convinced that exceptional industrial ceramics should possess three core attributes:

Precision Matching: We don’t simply supply products to customers; we become their “materials doctors.” Just as doctors prescribe treatments based on diagnoses, we recommend the most suitable material solutions based on customers’ actual working conditions—operating temperature ranges, corrosive conditions, mechanical loads, and thermal cycling rates.

Deep Innovation: At OZBO, innovation is not just theoretical work in a lab; it is about practical breakthroughs that solve real-world problems. Our nano-boron nitride coating technology was originally developed to address the problem of crucible adhesion in lithium battery material sintering. When we saw that traditional silicon carbide crucibles required strenuous cleaning after each use, while our coated products enabled simple demolding, we knew we were on the right track.

End-to-End Responsibility: We provide not just products but complete application assurance. From material selection guidance and construction process training to usage tracking, the OZBO team always supports our customers. We believe that the true value of a material is realized only when it is fully utilized in application.

Industry Ceramic
Silicon Carbide Crucible

The Stories Behind Our Products

About Recrystallized Silicon Carbide Kiln Rollers: We once served a premium electronic ceramics manufacturer whose kilns needed to operate continuously for 3 months without downtime, placing extremely high demands on the high-temperature creep resistance of the rollers. Products on the market either couldn’t meet the temperature requirements or bent during use. By optimizing material purity and microstructure, OZBO’s R&D team developed recrystallized silicon carbide rollers with 40% improved creep resistance, enabling our customer to achieve reliable continuous production. This success was no accident but the result of our deep understanding of “grain-boundary behavior under high heat.”

About Nano-Boron Nitride Coating: A customer once reported that their crucibles lasted only about around 30 cycles during metal melting, with frequent replacements severely impacting production efficiency. Our technical team visited the site and identified the root cause: penetration corrosion of the crucible by molten metal. By applying OZBO’s nano-boron nitride coating, the crucible’s lifespan extended to over 100 cycles, increasing three times the customer’s production efficiency. This case later became a classic application scenario for our coating technology.

Industry Ceramic
OZBO Ceramic Components

Core Values: Safeguarding Industrial Excellence With Resilience

The core value of the OZBO brand can be summarized in one word: Resilience.

Material Resilience: Our products retain stable performance in harsh conditions—this is resilience at the physical level.

Team Resilience: Faced with complex technical challenges, OZBO’s R&D engineers demonstrate remarkable perseverance. To solve a coating adhesion issue, they once worked 12-hour days for three straight months, testing hundreds of formulation combinations.

Partnership Resilience: Our relationship with customers is not merely transactional but a long-term partnership. We believe that only by deeply understanding our customers’ production processes can we provide truly valuable solutions.

A Long-Term Commitment To The Future

Today, OZBO has grown into a well-rounded industrial ceramics brand. Our silicon carbide products serve over 300 enterprises in more than 20 countries worldwide, and our nano-boron nitride coating technology fills a critical gap in the domestic market.

But we have never stopped moving forward. Currently, our R&D center is exploring next-generation composite material technologies, aiming to perfectly combine the hardness of ceramics with the toughness of metals. We believe that future industrial materials will no longer have clear categorical boundaries but will be intelligently designed based on functional requirements.

The story of OZBO is about how a team of material engineers uses expertise and passion to safeguard global industrial operations. Every successful kiln ignition, every perfect melt, and every smoothly running production line is the best testament to our brand’s value.

I am Roger Luo, founder of the OZBO brand. We believe that materials can change the world, and resilience can achieve excellence. This is the story of OZBO—a story of perseverance, inventiveness, and protection.

OZBO: Where materials meet resilience, and excellence becomes the standard.

Categories
Shopping

Brass Compression Union Fittings Guide for Winter Plumbing Prep

Close to seven in ten of field techs now prefer compression-style fittings over solder for confined or gas line jobs. This shift underlines the critical need for dependable, leak-free connections on current job sites.
Buy 1 4 Compression Fittings
This quick guide delves into Compression Union Brass and other compression-style fittings commonly seen in plumbing, HVAC, and instrumentation in the U.S.. It offers useful guidance on picking the right 1/4 compression fitting, installing brass union fittings, and diagnosing seepage. It also explains compatibility between materials.

Whether you’re a working plumber, HVAC technician, instrumentation engineer, or a hands-on DIYer, this guide fits your needs. It focuses on practical job scenarios: simple installation, repeat use, and brass unions’ functionality when you can’t solder. We’ll contrast 1/4 inch compression fittings and couplers, calling out their top applications.

For parts and supplies, InstallationPartsSupply.com is a reliable source for brass compression union parts, compression nuts, and ferrules. They offer properly matched components fast. Later sections detail sizing guidance, pressure ratings, and installation tips to avoid leaks and cut down on return visits.

Key Takeaways

  • Compression Union Brass provides a solder-free, reusable joint for multiple tube types.
  • Brass compression union connectors are great for tight spaces and service repairs.
  • 1/4 compression fitting and 1/4 inch compression fitting sizes are widely used in plumbing and instrumentation.
  • InstallationPartsSupply.com keeps nuts, ferrules, and union bodies for fast replacement and proper matching.
  • Proper selection and installation cuts down leaks, with step-by-step details later in the guide.

What Brass Compression Union Fittings Are And How They Work

A brass compression union fitting joins two tube sections with no soldering. It features a body, a compression nut, and ferrules for a tight seal. The 1/4compression fitting is commonly used in instrumentation, refrigeration, and plumbing repairs.

Definition And Core Components

The brass compression union assembly consists of three core parts. The fitting body accepts tube on each end. The compression nut threads on to the body, pressing the ferrule into place. The olive creates a seal by compressing onto the tube’s OD.

Compression unions enable the joining of two tube ends inline without solder. Each end has its separate ferrule and nut, enabling quick joining of different tube lengths during maintenance or on-site repairs.

How It Works In Practice

To install, slide the tube into the fitting body and tighten the compression nut. When you tighten advances the nut, which drives the ferrule into the body’s tapered bore. This motion converts to radial squeeze around the tube.

This radial squeeze creates a line-contact seal between the olive and tubing. A well-made fit results in a metal-to-metal or metal-to-plastic seal interface depending upon materials. Incorrect tightening can deform the ferrule or fail to seat, weakening the connection.

Materials And Compatibility

Brass union fittings are known for their resistance to corrosion and workability. They perform well with copper tubing and many potable water systems. They also work with low-pressure gas lines when set up with gas-grade PTFE tape and remain accessible.

For higher pressures or harsh fluids, stainless fittings are preferred. Plastic compression connectors are best suited for low-pressure water tasks. The 1/4compression fitting is available in brass and stainless steel to match different tubing OD, operating pressures, and media requirements.

1/4 Compression Union

Compression Union Brass: Benefits, Common Uses, And Where It Fits

Brass compression union fittings combine rugged strength and practicality, ideal for plumbing and instrumentation tasks. They can be set up fast, with no need for the need for a torch, making them well-suited for compact or fire-risk zones. The 1/4 compression union and miniature 1/4compression fittings are popular for their space-saving, reliable joins.

Advantages Of Brass Unions

Installation is quick and simple with basic tools. No open flame or solder is needed, cutting time on task and fire risk. Many brass compression union nuts and bodies are reusable in many cases, cutting costs on repeat service calls. Ferrules (olives) may need to be replaced after multiple assemblies.

Brass resists corrosion and bends slightly under pressure, producing a tight seal with copper tubing. This reduces galvanic concerns when mated to copper or select stainless steel components. Makers specify many Compression Union Brass products for generous temp and pressure ranges, suitable for both residential and light-duty industrial work.

Common U.S. Applications

In home plumbing, brass compression union fittings are common under basins, at shutoff valves, and on water heater connections. The 1/4 compression coupling is commonly used in beverage systems, ice makers, and small water lines that need easy service access.

Gas distribution with accessible copper tubing sometimes relies on brass compression unions for inspection and simple take-apart. HVAC and refrigeration techs use brass union fittings for service runs that must be taken apart and put back together during routine service.

Instrumentation and industrial panels use small 1/4compression connectors for sampling, sensing, and pneumatic lines. These environments value the 1/4 compression union for leak-tight joints and quick replacement.

Why Pick Unions Over Other Options

Compression unions cut time compared to solder joints. Without a heat source, work can move forward in areas where heat is risky or where immediate return-to-service is needed. A brass compression union allows re-alignment and later disassembly for service.

Soldered joints often stay lower profile and can cost less in raw materials. Compression unions offer service flexibility and field-service advantages, making them the preferred choice when access, speed, and reuse are priorities. For many installers, a 1/4 compression coupling hits the right balance between compact size and dependable performance.

Selecting The Right 1/4 Inch Compression Fitting And Related Sizes

Selecting the right fitting involves knowing the terms and conducting a simple parts check. It’s essential to know if “1/4” refers to the tube outside diameter or the thread size before making a purchase. Many catalogs list separate SKUs for tube, union bodies, and inline connectors under the term “1/4 compression coupling”, “1/4compression fitting”, or “1/4compression coupler”.

Understanding common terminology

It’s important to know the basic components: the compression nut, ferrule (olive), union body, and coupler. The compression nut presses the ferrule against the tube and the tapered seat. A union body connects two ends, while a coupler connects two line ends in-line. Always refer to the manufacturer’s wording on product pages for accurate meanings.

Matching tubing OD, ferrules, and thread pitch

The tubing outside diameter must match the ferrule spec precisely. Ferrule shape and body taper angle can vary by brand. Mixing a ferrule from one brand with a fitting body from another can create seepage. Ensure that the thread style and thread pitch match for matching parts. Differentiate between NPT taper threads and straight, parallel threads that use sealant methods or O-rings.

Material and soft tubing notes

For PTFE or plastic lines, verify the ferrule design and whether a support insert is required to prevent collapse. Brass ferrules seat differently than stainless ferrules. If you need greater durability to aggressive fluids or temperature, consider stainless alternatives over standard Compression Union Brass.

Pressure and temperature factors

Pressure specs change based on the material and size. Brass and miniature fittings, suitable for instrumentation, will have lower pressure limits than bigger stainless fittings. Always consult the manufacturer’s pressure and temperature charts for the specific 1/4 compression coupling or 1/4compression coupler you plan to use.

Quick checklist

  • Confirm whether “1/4” = tubing OD or pipe-thread size.
  • Match tubing OD to ferrule size and brand profile.
  • Verify thread type and pitch; note NPT vs straight threads.
  • Confirm temp and pressure ratings for Compression Union Brass or other options.
  • For PTFE/plastic, verify need for inserts or secondary seals.
Item Typical Use Key Check Material Notes
1/4 inch compression fitting Pneumatic, instrumentation Check whether 1/4 refers to OD or thread Brass is typical; stainless for high PSI
1/4compression fitting (compact) Miniature lines, beverage systems Confirm ferrule geometry match Some brands use unique ferrules
1/4compression coupler Inline tube joins Check tube OD and internal bore Plastic lines may need inserts
1/4 compression coupling Panel joins, instrumentation Thread pitch and seal type Compression Union Brass is a common choice
Compression Union Brass Two-port unions, moderate-pressure systems Maker pressure/temperature charts Less suitable for extreme PSI or aggressive media

Installation Tips For Brass Compression Unions

Getting a Compression Union Brass union’s longevity depends on good installation practices. Begin by properly prepping the tubing and components before any final tightening. This early prep is essential in stopping seepage and problems later.

Preparing tubing for a reliable seal

Use a reliable pipe cutter to cut tubing square. Remove any burrs or scratches that could lead to leaks. It’s also important to check the tubing’s outer diameter for true roundness. Uneven diameters, often seen in coiled lines, can hinder proper compression.

Next, slide the nut and olive onto the tube correctly. Always use new olives, as they ensure a dependable seal, even on copper lines. For softer plastic tubing, consider using support inserts or supported ferrules to prevent wall collapse.

Proper tightening method

Begin by hand-tightening the nut. Then, follow the manufacturer’s recommended turn count. This approach helps create the correct seal without tightening too much.

It’s a common misconception that tighter is always better. Insufficient tightening can lead to a bad seal. Excess tightening, on the other hand, can ruin the sealing faces, threading, or cause leaks. After initial tightening, pressure up the system and tighten in small steps if slight seepage appear.

Two-wrench method and avoiding tube twist

Brace the fitting body with one wrench while turning the compression nut with another. This method prevents tubing twist and minimizes strain on connections.

In confined spaces, ensure the fitting body is held and aligned before the last turns. This prevents cross-threading issues and ensures the ferrule installation is proper. Proper technique keeps the fitting from distortion and guarantees a reliable seal.

Step Action Why it matters
1 Cut square, deburr, and inspect OD Prevents leak channels and ensures even compression
2 Slide nut and new ferrule onto tubing Proper ferrule install delivers predictable sealing
3 Finger-tighten, then turn per spec Creates a line-contact seal without damage
4 Use two wrenches: hold the body, turn the nut Avoids tube twist and cuts mechanical stress
5 Pressure test and adjust incrementally Prevents weeps and avoids over-tightening

Leak Troubleshooting And Maintenance For Compression Unions

This section covers frequent leak causes and easy remedies for Compression Union Brass connections. It walks you through checking the issue, deciding on snugging, replacing parts, or switching sealing methods. The aim is to ensure a safe, long-lasting joint for 1/4 compression sizes and other sizes.

How Tight Should You Make A Compression Fitting?

Achieve a tight seal without crushing the tube or ferrules by tightening the nut to the proper point. Many manufacturers recommend turns beyond finger-tightness over specific torque values. For copper tube, stop tightening when you feel resistance and apply only a few quarter turns with a wrench.

Too much tightening can warp ferrules, mark tubing, and complicate later removal. Too much compression is a frequent cause of leaks and wear to thread surfaces on Compression Union Brass parts.

Steps To Fix A Leaking Compression Fitting

Try the simplest step: hold the fitting body firm and tighten the nut a slight amount with a second spanner. This often resolves minor leaks without full breakdown.

If the leak won’t stop, break down the joint. Remove the nut and ferrule, then check the tubing and ferrule for damage. Replace any marred ferrule before putting it back together.

Apply approved PTFE tape for gas only for gas service when the manufacturer approves. Do not coat the ferrule unless directed by the maker. For PTFE tube showing creep, use a fitting with an internal O-ring or redundant seal to stop leaks.

Reassemble with a fresh ferrule and nut when required. Hand-tighten, then finish with the recommended number of turns. Test the joint under normal system pressure and watch for minor weeping.

When To Replace Ferrules Or Fittings

Replace ferrules showing deformation, scoring, or requiring more turns to seal. Do not reuse ferrules on copper tube for trusted lasting performance.

Replace the union body when internal taper surfaces, bores, or thread surfaces are marred, or when galling damage has occurred on stainless steel components. Source replacement ferrules, nuts, and bodies that match the original brand when possible to avoid mismatch problems.

Ferrule Types, Tubing Choices, And Material Considerations

Grasping ferrule styles and tubing selection is key to leak-tight seals. This guide breaks down common ferrule geometries and tubing materials. It helps installers and engineers avoid leaks and cut rework.

One-piece vs two-piece ferrules

Single-piece ferrules are straightforward. A single part grips the tubing, creating a seal. They work well on soft-wall tubing like brass tubing or some plastic tubing. This design also reduces parts inventory.

Two-piece ferrule systems split the load into a front and a rotating rear ferrule. The rear ferrule decouples torque from the sealing face. This design increases lasting reliability for stainless steel lines and high-vibration runs. It’s popular where thread galling and uneven loading are concerns.

Symmetrical vs asymmetrical ferrules

Symmetrical olives have a double-cone shape and install both ways. This reduces assembly time when you’re doing many installs. They can wander off-axis more easily, which may lead to slight leaks on very hard plastics.

An asymmetric ferrule has a tapered shape and must be oriented correctly. It gives better axial alignment and resists off-axis movement. This makes it the go-to choice for precision applications where alignment and repeatable seals matter.

Choosing tubing: metal vs plastic and PTFE concerns

Metal tube like copper tubing or stainless steel tube offers rigid sidewalls that hold consistent contact with the ferrule. Use clean, square-cut ends to preserve seal strength with 1/4compression fittings and larger sizes.

Stiff plastics like PEEK and PTFE substitute materials can work when they are stiff. Soft plastics such as polyurethane and vinyl are poor choices without stiffening. Tube inserts help when the wall is overly flexible.

PTFE tubing brings excellent chemical resistance and flexibility, but it tends to cold-flow under compression and heat exposure. This cold flow can lead to leaks over time. Use fittings designed for PTFE, secondary seals, or internal tube supports to mitigate creep when PTFE tubing is required.

Characteristic One-piece ferrule Two-piece ferrule Symmetrical ferrule Asymmetrical ferrule
Best for Soft tubing, simpler inventory Hard tubing, vibration-heavy runs Fast assembly, reversible Axial alignment, precision work
Installation sensitivity Low Medium (proper orientation helps) Low High (must be oriented)
Resistance to galling Low High Medium High
Suitability with PTFE tubing Limited without inserts Better with inserts or o-rings Possible with support Preferred when alignment is critical
Typical use with 1/4compression fittings Common in general plumbing Used for instrumentation and gas service Used for high-volume assembly Used in precision and high-tech work

Pair ferrule geometry to tubing wall stiffness, system pressure, and assembly volume. For PTFE tubing, specify fittings that include secondary sealing or use tubing inserts. Consult tubing and fitting manufacturers for final compatibility checks before installing critical runs.

Comparison: Compression Unions Vs. Soldering And Other Joining Methods

Selecting the right joining method is important for safety considerations, serviceability, cost, and visual finish. Compression unions are great for tight spots and near combustible materials due to their tool-light installation. Solder work, on the other hand, creates compact joints that many plumbers favor for visible runs and lasting installs.

When to pick compression unions over soldering

Choose compression unions when flame use is unsafe or restricted. A 1/4 compression union or a 1/4 compression coupling allows for rapid fixes without shutting down large systems. Compression Union Brass parts enable fast serviceability and repeated breakdown for testing work or adjustments.

Compression trade-offs vs soldering

Soldered connections are often less expensive per joint and sit closer to the pipe for a cleaner look. Soldering can deliver durable, vibration-tolerant connections for many permanent installations. Compression unions, while bulkier and more expensive per fitting, are attractive when rework needs, field changes, or spark-free methods are priorities.

Mixing components and manufacturer compatibility

Do not interchange ferrules, nuts, and bodies from different brands unless the supplier verifies compatibility. Differences in seat angle, ferrule length, and thread pitch can break the seal. For high-importance or high-purity runs, use manufacturer-specified ferrules and parts designed to resist thread galling and meet cleanliness standards.

Quick checklist

  • If space is limited or open flame is risky, pick compression unions.
  • For long exposed runs prioritizing appearance and permanent joints, consider solder joints.
  • Match up 1/4 compression union parts by maker when using 1/4 compression coupling assemblies.
  • When maintenance access matters, Compression Union Brass units give dependable reuse and fast replacement.

Conclusion

Compression Union Brass fittings serve as a dependable alternative for solder in many fields like plumbing, HVAC, gas service, and instrumentation. When properly chosen and installed, they ensure leak-free performance. This is achieved without the need for a torch or specialized tools.

Following installation basics is key. Ensure tubing is cut square and select the appropriate ferrule and size, which is essential for a 1/4compression fitting or union. Follow the manufacturer’s guidelines for tightening turns. This step is crucial to avoid tubing twist and to maintain the ferrule seal quality.

For handling minor leaks, a simple tightening often suffices. Replace ferrules that show signs of deformation or work hardening. It’s also important to avoid mixing components from different manufacturers to preserve the seal’s reliability. For all your needs, refer to InstallationPartsSupply.com. They offer a wealth of information on size charts, matching ferrules and unions, and locating the right Compression Union Brass components for your project.

Categories
Shopping

Comparing Toggle Bolts vs. Plastic Anchors in Drywall Anchor Kits

When you need to mount mirrors, shelving units, or televisions, a drywall anchor kit is essential. Plasterboard on its own won’t support significant weight; fasteners may loosen or rip out. This poses dangers of damage or harm. A good quality anchor kit supplies the needed components for a range of projects.
Click Here To View Mounting Screws And Anchors
Premium sets feature a range: self-drilling anchors, toggle anchors, hollow wall anchors, and plastic expansion anchors, together with a choice of fasteners. As a result, you’re equipped to manage different weights and wall types smoothly.

Manufacturers such as CrimsonMark, Toggler Snaptoggle, KIRUI, AKKTOL, Ansoon, E-Z Ancor, and Everbilt are top-rated for their durability and reliability. Installation Parts Supply.com is a top choice for complete drywall screw holder assortments and mounting hardware. It caters to both homeowners and DIY enthusiasts.

This guide aims to provide U.S. homeowners, renters, and DIY builders with straightforward, actionable advice. It focuses on selecting and employing a wall anchor set for mounting fixtures securely.

The Role Of Drywall Anchors In Safe Mounting

Drywall is common in U.S. homes, consisting of a plaster core and paper facing. Regrettably, it is insufficient for bearing weight by itself. Just screwing a screw directly into the board results in damage. Proper dry wall screws and anchors stop these failures, ensuring stability.

Limits Of Drywall Alone

Regular half-inch drywall struggles with medium or heavy weights without support. A naked screw may hold for a moment but eventually, the gypsum core will give way. This results in the fastener pulling out. For items like cabinets, TVs, and shelving, this might result in unexpected detachment.

Hazards Of Poor Mounting Techniques

Hanging objects with basic nails or unanchored screws increases the danger of slips and wall damage. Heavy objects can drop, which can hurt people and damaging belongings. Furniture not secured to the wall poses a tipping danger, particularly in households with kids.

Aligning Anchor Types With Project Needs

Selecting the correct fastener relies on the load and motion. Lightweight decorations approximately 20–25 lb is best suited for plastic expansion plugs. Medium loads near 75 pounds require a drywall screw with an anchor like a self-drilling threaded anchor. Mollies or hollow wall sleeves are great for about 65 pound medium-duty fixtures.

When dealing with heavy objects like big cupboards, televisions, and shelves, heavy-duty toggle bolts are essential, supporting over 200 lb when correctly mounted. Always check ratings on packaging and confirm wall suitability before beginning. Most kits provide a range of sizes to find the right fastener length and appropriate anchor type for your project.

Drywall Screw Mounts

A Guide To Various Anchors And Kit Options

Choosing the right anchor requires understanding how each type grips drywall and the tools provided in a set. A comprehensive drywall anchor kit or screw anchor kit simplifies tasks, from mounting pictures to putting up shelving. We will discuss common options, emphasizing the value of a drywall screw holder or an sorted anchor kit.

Self-Drilling Anchors And Drywall Screw Holder Sets

Self-drilling anchors, available from brands like Ansoon and CrimsonMark, are available in plastic or metal‑reinforced nylon. They are screwed directly into drywall without a pilot hole, usually supporting around 75 pounds depending on anchor size and board depth.

Sets featuring these fasteners, matching screws, and a marked organizer enable quick, organized installations. Such screw and anchor sets, with different dimensions, simplify choosing the right fit for picture frames, small shelves, and light fixtures.

Heavy-Duty Solutions With Toggle Anchors

Toggle bolts, such as the Snaptoggle style, spread the load behind the wall. This technique carries significant weight, like televisions, cupboards, and lighting. The Snaptoggle brand, for example, can support up to 238 lb in gypsum board, with higher ratings for solid materials.

Heavy-duty kits usually contain strap toggles, spring toggles, and extended bolts for thicker walls. These steel parts minimize shifting, providing lasting holds for big items.

Using Mollies And Sleeve Anchors

Mollies, hollow metal sleeve anchors, expand during installation. Typically made of zinc-plated steel, they require a pilot hole. A properly fitted molly supports about 65 lb, making it suitable for mid-sized loads like cabinets.

Sets come with installation tools and multiple sleeve sizes, letting you match of anchor size to load and wall thickness. Reusable options allow simple tweaks without making the hole bigger.

Ribbed And Push-In Anchors For Small Weights

Plastic plugs, available at retailers like The Home Depot, are simple to install. They push or twist into tiny pilot holes, usually supporting 20 to 25 pounds.

These anchors are ideal for hanging small frames, blinds, and light décor. Comprehensive screw anchor kits often contain a mix of these anchors, alongside matching screws and a storage box for efficient hanging tasks.

Selecting The Best Drywall Anchor Set For Your Job

Choosing the right wall anchor kit starts with a plan. Think about the item being mounted, the forces at play, and the wall type. A thoughtful choice of fastener combination can save time and prevent mistakes.

Assessing Weight And Dynamic Forces

Start by determining the item’s weight. Take the dead weight as a starting point, then factor in possible motion like tugging or vibration. Items such as curtain rods or shelves, which might move or bear additional weight, need a bigger safety buffer.

For mid-range weights, choose anchors with a 75 lb rating for sheetrock. For heavier items, use toggles or strap anchors rated above 200 lb. Always check the fastener’s suitability with the surface.

Wall Composition And Thickness Factors

Identifying the wall type is crucial. A drum-like sound typically signifies gypsum, while a solid sound indicates plaster or masonry. Each requires specific anchors and drilling bits.

Regular indoor sheetrock is typically 1/2″ thick. Walls of 5/8″ thickness or double-layered constructions need longer anchors. Toggle anchors and molly bolts require sufficient cavity depth for proper deployment. Select masonry fasteners for masonry walls.

Kit Organization And Inclusions

Look for kits that include a mix of fastener styles: threaded anchors, plastic ribbed anchors, molly bolts, and toggle bolts. Ensuring that screws fit the included anchors prevents installation issues.

Good sets have organized compartments, installation aids, and clear guides. Neat cases, such as ones by Installation Parts Supply.com and KURUI, keep components readily available while working.

Item Ideal Usage Standard Weight Limit Found in good kits
Threaded Anchor Light to medium loads, small shelves 10–50 lb Various sizes, screws, bit
Plastic ribbed anchor Light fixtures, picture frames 5 to 25 lbs Different sizes, screws, guide
Molly bolt Medium loads, brackets, towel bars 50–150 lb Various lengths, tool, screws
Toggle anchor (including Snaptoggle) Heavy loads, TVs, cabinets 100 to 300+ lbs Toggles, long bolts, installation guide
Concrete Anchor Hard surfaces, masonry Varies by anchor and substrate Masonry screws, bit details

What You Need For A Professional Installation

Start with the basics: drill/driver and various sized drill and driver bits. These are for creating pilot holes and securing anchors. Add a screwdriver or compatible bits to tightly set screws without stripping them.

Employ a stud detector for heavy items, and a measuring tape and a long level for accurate marking and leveling. Essential: put on safety goggles to guard your eyes while drilling.

Keep pliers and a hammer on hand for removing anchors and for light tapping. A screw magnet or holder will steady screws, making installations quicker.

Pick a screw anchor kit appropriate for the weight and surface. Ensure it includes various anchors like threaded, mollies, and plastic plugs for any job.

Arrange your hardware in a transparent case. Tag your drill bits with painters tape for depth control and to safeguard surfaces while drilling.

For securing furniture, use furniture straps or angle brackets. Drive screws into studs for solid connection to studs. Heavy pieces shouldn’t rely solely on drywall plugs for safety.

A useful tip: when drilling pilots, select a bit thinner than your anchor and indicate depth with a piece of tape. Maintain a marked kit of frequent-use drywall screws and anchors for rapid maintenance.

Possessing an organized screw anchor kit and proper tools reduces installation time significantly and limits damage to walls.

Step-By-Step Installation Guides For Common Anchor Types

Use these instructions to secure firm mounts with either a drywall anchor kit or a standard fastener pack. The instructions cover steps for self-drilling anchors, toggle systems, mollies, and plastic plugs. Choosing the correct drywall screw mounts minimizes the risk of rework and wall damage.

How To Install Self-Drilling Anchors

First, indicate the spot and position the anchor with the wall. These anchors generally don’t require pre-drilled holes.

Use a screwdriver, or use a drill at a slow speed, to embed the anchor until it’s flush with the wall. Next, insert the screw and tighten it just until it’s secure. Be careful to halt before the anchor begins to rotate freely or ruins the board.

Installation Of Toggle Systems

Begin by boring a opening following the maker’s instructions. Then, slide the channel through the hole, and tighten the plastic to ensure it lies flat inside the wall.

Following the specific instructions, either snap or trim the plastic legs. Next, screw the bolt into the channel. Toggles spread the load more efficiently, ideal for mounting heavy objects. Ensure the space behind the wall is deep enough to fit the toggle.

How To Install Molly Bolts And Sleeves

Bore an opening that fits snugly the anchor diameter. Insert the bolt, then tighten the screw to flair the sleeve, or use a specialized setting tool from your kit if you have one.

This process makes the anchor clamp behind the drywall, holding it fast. Molly bolts are appropriate for mid-duty jobs like mounting shelving or bathroom cabinets. Handily, the bolt can be unscrewed and reinserted if necessary.

Mounting Lightweight Decor With Plastic Anchors

Make a hole a bit smaller than the plug or just press in the plastic plug and hammer it gently. After that, tighten the screw until it is firmly in place.

Plastic plugs expand a bit to secure lightweight items like frames or decor, holding roughly 20 to 25 pounds in regular sheetrock. They are great for light duty use due to the small holes they cause.

Project-Specific Examples Using Anchor Kits

In selecting fasteners, consider the item and the surface material. An effective screw anchor kit provides a mix of anchors and screws. This guarantees you find the ideal fit for various fixtures.

To hang floating shelves

To hang floating shelves and curtain rods, opt for self-drilling anchors or mollies. These should have a rating of about 65-75 pounds each. Ensure you distribute the load over multiple points and stick to the spacing guidelines. Companies such as E-Z Ancor and KURUI are known for selling dependable threaded anchors perfect for these purposes.

Installing heavy objects

Hanging heavy loads requires the use of toggle bolts or stud attachments. Choices such as Toggler Snaptoggle and winged toggle bolts have greater strength versus standard anchors. Anchor into studs when possible by driving screws directly into them. If studs aren’t an option, pick a high-grade screw anchor kit with strong toggle bolts for a safer installation.

Securing lightweight frames and decor

Lighter objects like photos and trinkets are best with plastic ribbed or push-in anchors. These should be rated for 20–25 lb. Such anchors cause less damage with smaller holes, simplify removal, and are frequently found in sets from Everbilt. Use several anchors for grouped items to maintain a balanced look.

Anchoring furniture for tip-over prevention

To keep furniture upright, attach it with heavy-duty screws or safety straps. Avoid relying solely on regular plastic plugs. Opt for furniture anchor straps or metal brackets secured into studs. Or, specialized kits provide the necessary stud-mount hardware. In rental properties, ask your landlord before drilling and select hardware that meets code.

Safety, Extraction, And Care For Drywall Anchors

Begin with a thorough check of each installation. Give a firm pull on mounted items to notice any give. For items bearing heavy weight, add weight gradually as per the guide, checking along the way. Also, consider vibrations from doors or frequent use. These factors demand a strong fastener with an correct anchor.

To ensure a secure hold, increase the load gradually, not all at once. An object may appear stable at first but fail with continuous use. Switch to a stronger anchor system if it moves while testing.

Pulling out anchors and keeping the wall safe requires knowing your anchor type. For standard plugs, partially screw in, then grab with pliers to pull it out cleanly. This method causes minimal wall damage.

Plaster walls require a soft touch. Use a piece of wood against the wall to evenly distribute force and minimize plaster breakage. With threaded molly bolts, unscrewing partially straightens the sleeve, facilitating a neater removal.

With toggle systems, adhere to the maker’s instructions for taking them out. You might need an inner part unlocked or the strap cut for extraction. If removal is impossible, sever the screw, push the rest in, and cover the hole.

To mend tiny holes, use spackle and smooth for a smooth finish. Repair larger areas with a mesh patch and filler, making sure the wall is strong before reusing of fasteners.

Decide to reuse anchors based on their current state. Fasteners from good brands like Toggler or sturdy metal molly bolts are can be used again if perfectly intact. Throw away and swap any that are damaged or worn.

With heavy furniture or fixtures, the risks are significant. Avoid reusing lesser anchors. Switch to hardware designed for wall studs or a high-capacity screw and anchor set. Choosing the right hardware lowers risk and ensures safety.

Task Advice When to Replace
Test hold Incremental weight checks and gentle tugs If movement or noise occurs
Removing Plugs Use screw and pliers to pull If it bends or sticks
Removing Bolts Back screw to collapse sleeve or follow product steps If damaged or stripped
Plaster repairs Protect wall with wood block If plaster cracks or crumbles
Reusing Parts Inspect; use new for heavy items Always new for heavy loads
Buying Kit Pick a screw and anchor kit with varied sizes and clear ratings If kit lacks ratings or sizes

Final Thoughts

A quality anchor set can turn a wobbly job into a secure one and reliable. For lightweight items, plastic plugs work fine. Medium-sized shelves require toggles or mollies. Heavier items like televisions and cupboards usually require stud mounting or heavy-duty fasteners. A well-marked set eases choosing the right part by displaying ratings and screw sizes.

Begin by examining the wall’s material and thickness. Next, select an anchor and screw set that gives specific ratings. The right equipment—a drill/driver, a stud finder, and a spirit level—are vital. Proper following of installation instructions ensures anchors are correctly positioned.

To prevent furniture from tipping over, anchor it to framing with safety straps or metal angles. Regular plugs won’t hold heavy furniture securely. Choose quality sets and high-quality hardware to ensure safe setups. After fitting anchors, test the hold and swap them out if loose or damage.

Selecting the best anchor set and equipment is vital for safeguarding your walls and belongings. Always opt for high-quality parts, follow the manual, and test the strength on mounts. This approach contributes to a safer home and lasting results.

Categories
Shopping

Water Pressure Regulator Valves: What Contractors Wish Homeowners Knew

Reality: public mains can hit 150–200 PSI, more than enough to split couplers and stress valves fast. This brief walkthrough breaks down where a brass, dome-style control unit sits directly after your primary shutoff to cut incoming pressure to about 50 PSI. It protects pipes, fixtures, and appliances from leaks and shortened lifespans.
Purchase Water Main Pressure Regulator
You’ll learn the exact install point on the main line, what the internal components do, and simple tests to tell whether it’s time to replace it. The piece also explains costs—from common part costs to what pro installation might run.

Installation Parts Supply remains a convenient one-stop shop for the parts, fittings, and tools covered in this guide, so homeowners and DIYers can grab the right items without hassle.

When you finish, readers will see how taming excess pressure helps keep household plumbing protected and a relatively small spend helps prevent expensive repairs over time.

What Water Pressure Regulator Valves Do And Why They Matter In Your Home

A home benefits when a single whole-house unit keeps incoming pressure in a steady, safe band for all downstream plumbing.

That single device reduces incoming water pressure into a safer zone so that pipes and fixtures aren’t under constant stress. Most residential systems work best near 50 psi, with a common working range of 40–60 psi.

Protecting Pipes, Fixtures, And Appliances From High Pressure

Reducing excessive pressure can reduce persistent drips, tiny pipe failures, and even failed supply lines. It also reduces sudden surges that trigger water hammer noise plus shaking.

Typical Home Water Pressure Ranges (40–60 Psi Sweet Spot)

Keeping pressure in that window helps ensure taps to flow smoothly, toilets fill correctly, and showers stay consistent. Dishwashers and washing machines often last longer when not exposed to ongoing excessive pressure.

  • Whole-home protection protects every branch of the plumbing system at once.
  • By reducing extra strain, homeowners reduce dripping fixtures and water loss.
  • Installation Parts Supply offers pressure-reducing parts and accessories for a quicker, more dependable install.

How A Pressure Regulator Works: Diaphragm, Spring, And Adjustment Screw

Inside most residential units, a diaphragm backed by a spring is always adjusting to keep outlet levels steady.

Household Water Pressure Regulator

Core Components And How They Act

At the core of the unit are a flexible diaphragm paired with a metal spring that react quickly to changes in inlet pressure changes.

When inlet pressure climbs, the diaphragm presses in to limit flow into the home. When the inlet drops, the diaphragm opens up so more flow can pass.

Fine-Tuning With The Adjustment Screw

The screw on top sets tension on the spring to set the outlet setpoint. Tightening the screw increases spring tension and lowers the outlet pressure.

Backing the screw out reduces tension and lets the home operate at a higher level. Units with easy top access make this simple for homeowners.

  • The spring and diaphragm keep outlet levels steady via automatic modulation.
  • This mechanism dampens spikes and dips so fixtures behave predictably.
  • Installation Parts Supply stocks maintainable units with easy adjustment for long-term control.
Action Immediate Effect Homeowner Control
Diaphragm tightens Reduces flow, lowers outlet level Automatic
Diaphragm relaxes open Boosts flow, increases outlet pressure Automatic
Top-mounted adjust screw Sets spring tension and target outlet Manual adjustment

Where It Installs: Main Water Line Enters The Home

The best location for the regulator is just downstream of the main shutoff, at the point the main line enters the home.

Place the device directly after the main shutoff valve so that the entire plumbing system receives steady outlet pressure. You’ll usually find space in a basement, garage, or crawlspace by the foundation wall. That location protects all branches, fixtures, and appliances using one device.

Placement After The Main Shutoff Valve For Whole-House Protection

The preferred location is right after the shutoff so one regulator controls the whole system. An accessible installation makes later service or replacement easy.

  • Installing it at the entry point means one adjustment changes all downstream lines evenly.
  • When space is limited, a licensed plumber can reposition the main valve or add unions and couplings for a clean connection.
  • Correct orientation and pipe support avoids strain from pipe weight or impacts.
  • Labeling the shutoff, device, and test points helps anyone find components fast.
Location Benefit Action
Just after main shutoff Protects the whole house Fit the regulator plus test points
Basement / garage Convenient service access Mount along the foundation wall
Tight layout Requires valve move Call licensed plumber

Installation Parts Supply stocks whole-house regulator units, plus unions and couplings sized for your main service line. Choosing the correct fittings delivers a clean connection and uniform system performance.

Do You Need One? Testing Incoming Water Pressure Today

A quick gauge check at an outdoor spigot quickly shows whether your home sits in a healthy PSI range.

To check incoming pressure, thread a gauge onto an outdoor spigot or the washing-machine cold tap. Ensure all taps, sprinklers, and appliances are off so the gauge shows true static pressure.

Using A Gauge At A Hose Bib Or Washing Machine Faucet

Check the gauge with no water running. A stable 40–60 psi reading is the sweet spot for typical homes.

Readings over 80 psi suggest excessive stress on the plumbing system and raise the risk of leaks and premature failures.

Recognizing Symptoms That Suggest A Problem

Listen for pipe banging, random swings in flow in the shower, or repeated drips at supply lines. These issues commonly suggest high PSI or a failing regulator.

When Municipal Levels Spike And How To Retest

Municipal supply often rises at night. Measure at multiple times, especially early morning, to catch spikes that don’t show up in daytime readings.

If the adjustment screw stops affecting the gauge, the unit likely needs replacing.

  • Buy an inexpensive threaded gauge for accurate static-PSI checks.
  • Test with all water off for true static readings.
  • Retest at night if you suspect municipal spikes.
  • Order gauges, replacement parts, and reliable units via Installation Parts Supply for quick U.S. delivery.

Selecting The Right Regulator For Your Plumbing System

Choose a valve that matches the home’s demand and resists corrosion for long-term, low-hassle service.

Materials That Last

Choose bronze-body construction and a stainless steel strainer. Those materials stand up to corrosion and reduce maintenance calls.

A robust body shields the diaphragm and spring so the regulator maintains steady outlet pressure over time.

Sizing For The Main Line

Size the regulator to your main line diameter. A too-small valve restricts flow; an oversized regulator may be more than you need.

When To Replace

Most units last 4–12 years. Many manufacturers recommend swapping it around five years to reduce failure risk.

  • Select a bronze valve with a stainless strainer for long life.
  • Confirm the outlet range supports a 50 psi target comfortably.
  • Swap it proactively if pressure drifts or adjustments won’t stick.
  • Make sure the adjustment screw and unions are easy to reach for future service.
Feature Why it matters Typical cost
Bronze body Better corrosion resistance $50–$100
Stainless strainer Protects internals Included/extra
Correct size Maintains flow at peak use Varies by line

Installation Parts Supply carries regulators, unions, and fittings so shoppers can order a complete upgrade from one place.

Water Pressure Regulator Valves: Step-By-Step Installation Guide

Quick preparation keeps the job neat and safe. Start by turning off the main supply at the home’s main valve and open the closest faucet to relieve residual water. Set a bucket and towel below the work area to catch any drips and keep the area protected.

Measure out the regulator plus threaded couplings and mark square cut lines on the line. Cut the pipe, then clean the pipe ends and fittings with grit cloth plus a wire brush so solder bonds well.

Couplings And Soldering

Add flux to both surfaces, heat the joint evenly with a torch, and feed in solder until it wicks fully into the gap. Let the joint cool before continuing.

Mounting, Tightening, And Leak Checks

Place the regulator with the correct flow direction, hand-tighten the unions, then snug them with pliers without cranking too hard. Turn the supply back on slowly, bleed trapped air at a nearby faucet, and inspect every joint for drips under normal flow.

Pro Tip: When To Call A Licensed Plumber

If you need to move the main valve or space is too tight to fit the unit correctly, hire a licensed plumber to reposition the main line and keep the install code-compliant.

  • Installation Parts Supply stocks regulators plus couplings, solder, flux, grit cloth, unions, and tools for a complete DIY kit.
Step Action Why it matters
Prep Shut off main, drain lines, protect area Limits spills and hazards
Solder joints Clean, flux, heat, solder Builds leak-resistant connections
Test Turn on slowly, bleed air, check Confirm system integrity

Adjusting, Maintenance, And Cost Considerations

Holding a steady outlet setpoint helps preserve fixtures and can prevent gradual damage.

Dialing In Psi: Loosen Locknut, Turn The Adjustment Screw, Verify

Connect a gauge to a hose bib and note the current reading. Back off the locknut, then turn the top adjustment screw a little at a time.

Tightening the screw boosts spring tension and drops the outlet setpoint. Backing it out does the opposite.

After each change, crack a nearby faucet for a moment to stabilize the flow, then check the gauge again until it remains stable.

Annual Checks And Signs It’s Time To Replace

Make yearly verification part of routine maintenance. Keep an eye out for unexplained swings, continued banging, or recurring drips from fixtures.

If turning the screw no longer changes readings or the setpoint drifts, replace the unit to avoid unseen stress throughout the system.

Diy Vs Pro: Costs And Tools To Have On Hand

Common units are $50–$100, and bigger line sizes up to about $200. Pro installation runs roughly $250–$450 depending on location and complexity.

  • DIY needs: couplings, pipe cutter, grit cloth, flux, solder, and a torch.
  • A pro adds speed, code compliance, and warranty coverage.
  • Track dates, readings, and adjustments so troubleshooting is faster later.

Where To Buy: Installation Parts Supply

To keep it simple, order gauges, replacement parts, and complete install kits through Installation Parts Supply. Many products ship fast throughout the United States, so maintenance and upgrades are simple to schedule.

Item Typical Cost Why it matters
Residential unit (bronze) $50–$100 Durable body with reliable outlet control
Pro installation $250–$450 Includes repositioning main valve and warranty
DIY toolkit $40–$120 All-in parts/tools for a complete job
Pressure gauge $10–$40 Check PSI and confirm the setting holds

Conclusion

A correctly sized bronze unit with a stainless strainer keeps household pressure steady and can help prevent costly pipe and fixture damage.

Installed just after the main shutoff, the regulator keeps outlet pressure within 40–60 PSI so showers, taps, and appliances operate smoothly. The spring and diaphragm work together to soften surges from the water supply.

Routine checks and timely maintenance—often replacing proactively around five years—avoids failures and hidden damage. For dependable in-stock choices and fast delivery, wrap up the project with Installation Parts Supply and you’ll enjoy quieter, longer-lasting plumbing at home.

Faq

What Does A Regulator Do And Why Does It Matter In A Home?

A regulator controls incoming mains flow to keep outgoing psi steady. It protects pipes, faucets, and appliances from damage caused by spikes or sustained high levels. Good control extends fixture life and reduces leaks and system noise.

What Is The Ideal Psi Range For A Typical House?

Most homes aim for a 40–60 psi sweet spot. This band gives good flow for showers and appliances while reducing strain on fittings and seals. Higher readings can cause premature wear and low readings lead to poor flow.

How Does The Device Work Internally?

Inside is a spring-loaded diaphragm that opens or closes the passage to regulate flow. The spring sets the target outgoing pressure, while the diaphragm reacts to supply changes and smooths spikes and drops.

How Is The Adjustment Screw Used To Fine-Tune Outgoing Pressure?

The top adjustment screw increases tension when tightened (raising the setpoint) and lowers it when loosened. A locknut holds the setting. Check with a gauge after small turns to avoid overcorrecting.

Where Should It Be Installed On The Main Line?

Install it on the main line where service enters the house, typically right after the main shutoff. That placement provides whole-house protection and keeps maintenance straightforward.

How Can Someone Test Incoming Pressure To Know If They Need One?

Attach a pressure gauge to a hose bib or washing machine faucet and open the valve. If readings go beyond 60 PSI or fluctuate heavily, install a regulator or service the one you have.

What Signs Indicate An Existing Unit Needs Replacement?

Ongoing pressure swings, leaks at the regulator, inability to hold a set PSI, or visible corrosion point to replacement. Older models that fail frequent checks should be swapped for newer, reliable units.

How Does Sizing And Material Choice Affect Performance?

Choose a body size that matches the main line and a unit rated for the desired psi range. Durable materials such as bronze bodies and stainless screens resist corrosion and clogging, improving longevity.

Can A Homeowner Install A Regulator As A Diy Project?

Yes, a competent DIYer can install one: shut off the supply, drain lines, cut and fit couplings, and secure the regulator. Correct soldering (or compression fittings) and leak checks are essential. If relocation or complex changes are needed, call a licensed plumber.

How Should The Unit Be Adjusted And Maintained?

Back off the locknut, adjust the screw in small steps, and recheck with a gauge. Check annually for leaks, debris buildup, and spring fatigue. Replace cartridges or the whole unit if performance degrades.

What Are Typical Costs And Tools Needed For A Diy Install?

DIY costs include the regulator, fittings, flux, solder or compression fittings, and a pressure gauge. Costs vary by model and materials; hiring a plumber adds labor but helps ensure correct placement and code compliance.

Where Can One Buy Reliable Parts And Fittings?

Reputable suppliers such as Home Depot, Lowe’s, and specialty plumbing stores carry quality regulators, bronze bodies, and strainers. Installation Parts Supply and established brands offer certified models and replacement components.

When Should A Plumber Be Hired Instead Of Doing It Yourself?

Bring in a pro for complex main relocations, soldering near electricals, code questions, or if tools/comfort level are lacking for shutting down and recharging the main line. A licensed contractor ensures a safe, code-compliant install.
Categories
Shopping

Passive Thermosiphon Solar System Installation

Discover No Electricity Hot-Water Heater Options

In this guide, you’re about to explore practical no electricity water heater and see how they suit off-grid lifestyles, remote properties, and backup strategies for homes across the United States.

To begin, this section outlines several alternative water heating options. You’ll look at tankless propane models, gravity-fed thermosiphon designs, wood-fired boilers, and solar water heating solutions. You’ll learn how non-electric hot water heaters maintain reliability through outages, trim operating costs, and cut dependence on grid power.

The article will compare performance, installation needs, safety, and code considerations in the United States. You’ll also learn about regular maintenance tasks and long-term cost breakdowns. You can expect straightforward guidance to help you choose off-grid water heating solutions that match your cabin, tiny home, or rural property.

no electricity water heater

  • No-electricity water heaters deliver reliable hot water even when grid power isn’t available.
  • Non-electric hot water heater options range from tankless propane and thermosiphon units to wood-fired and solar designs.
  • These alternative water heating choices work well for cabins, tiny houses, and remote properties.
  • You’ll learn about installation, maintenance, safety, and U.S. code considerations in later sections.
  • Choosing the right system can reduce operating costs and increase energy independence.

Understanding how no electricity water heaters function

There are several ways to get hot water without depending on grid power. Some systems rely on direct combustion, while others use solar thermal inputs or passive flow designs. In every case, the goal is to deliver consistent hot water without electric controls or pumps.

Basic operating principles

Combustion-style units use propane, natural gas, or wood as fuel to heat water. They may heat water on demand or store hot water inside an insulated tank. By contrast, tankless propane water heaters raise water temperature as it moves through a compact heat exchanger. This means fuel is only used when a tap is opened.

Tank-style systems keep a stored reserve of hot water, whereas tankless units depend on instantaneous heat transfer. Either way, the approach is intended to ensure hot water is available when you need it.

Physical and chemical cleaning principles in non-electric designs

Some non-electric hot water heaters apply gravity flow to help reduce sediment buildup. They incorporate internal baffles and flow paths that guide particles towards drain points during use. This helps in maintaining water quality and reducing the need for manual maintenance.

These systems also employ chemical coatings or media inside the tank. Such coatings hinder bacterial growth and scale deposits without powered filtration. As a result, there are fewer odors and less fouling on heat exchange surfaces, supporting consistent hot-water delivery.

Common fuels and heat exchange techniques

Frequently used fuels are propane, natural gas, wood, and solar-derived thermal energy. Tankless propane water heaters utilize compact counterflow or condensing heat exchangers. They are typically manufactured from materials such as copper or stainless steel.

Indirect-fired systems, on the other hand, use a coil or jacket around the tank. The coil or jacket moves heat from a separate burner or boiler into the stored water. Solar options capture heat using evacuated tube collectors or flat-plate panels.

Thermosiphon systems and gravity-fed arrangements move hot water with no mechanical pumps. They depend on natural convection forces. Many wood-fired units use direct-fired coils. In these designs, water passes through or around the combustion chamber for efficient heat transfer.

Advantages of selecting no electricity water heaters for your home

Moving to no electricity water heaters offers several practical benefits. These systems provide dependable hot water, even where the electrical grid is unreliable. They are perfect for off-grid living, reducing your reliance on utility power.

Staying reliable during outages and in remote areas

No electricity water heaters continue to provide hot water during grid failures. Tankless propane and wood-fired systems can provide on-demand or stored heat without electrical power. This makes them ideal for cabins, rural homes, and emergency preparedness.

Cutting operating costs while improving energy independence

Moving to non-electric systems can reduce your day-to-day running costs. In many regions, propane and cordwood cost less than electricity. Solar thermal options capture free sunlight, further cutting costs and supporting long-term energy independence.

Maintenance reduction with self-cleaning design features

Several non-electric units use internal agitation, shaped flow paths, or chemical dosing to limit scale and biofilm. These self-cleaning features reduce the need for descaling and sanitizing. This keeps performance steady and prevents unexpected service downtime.

Benefit Impact on your home Best-matched systems
Reliability during outages Ongoing hot water if the grid fails, improving safety and comfort Tankless propane units, wood-fired systems, gravity-fed setups
Reduced operating costs Reduced electric bills; fuel choice can lower ongoing expenses Propane tankless, solar thermal, wood boilers
Energy independence Reduced reliance on utility infrastructure; ideal for off-grid setups Solar thermal systems combined with no electricity water heaters
Lower maintenance needs Self-cleaning designs limit scaling and bacterial buildup Passive-flow tanks, chemically treated storage tanks, thermosiphon loops
Efficiency improvements Reduced fuel consumption and waste through efficient heat exchange High-efficiency wood-burning stoves and modern tankless units

Off-grid water heating solutions for sustainable living

Off-grid living calls for a reliable water heater to maintain comfort and independence. Off-grid solutions bring together simple physics and dependable fuel sources. They help ensure hot water in remote locations such as cabins, tiny homes, and rural properties. Here, you’ll find practical options and sizing tips for real-world needs.

Working with off-grid solar power and battery-free configurations

Solar thermal collectors heat water directly, removing the need for battery storage. Passive designs, including thermosiphon loops, move fluid using gravity and temperature differences. When installed with proper tilt and good insulation, these systems can be highly durable.

You can pair solar thermal with a tankless propane unit or gravity-fed heater as a backup. This hybrid approach leverages solar power on sunny days and non-electric backup on cloudy days. Brands including Rheem and Bosch produce tankless propane units well suited to off-grid lifestyles.

Sizing and capacity tips for off-grid households

Begin by estimating peak flow based on fixtures and their GPM. Efficient showerheads typically use about 1.5–2.5 GPM. Multiply peak demand by usage hours to determine tank size for solar collectors.

Account for collector area, tank capacity, and your available fuel sources. In many cases, a two-person cabin can manage with a 30–40 gallon tank and 20–40 square feet of collector area. Larger homes will need either more collector area or a larger storage tank. When you select a tankless unit, verify that it can handle your groundwater temperature and desired flow rate.

Example use cases for cabins, tiny homes, and rural properties

Many small cabins make use of compact tankless propane heaters or simple single-panel thermosiphon systems. Tiny houses typically choose tankless units for space efficiency and to sidestep bulky tanks. Combi setups, combining solar with propane, offer efficiency and reliability.

Rural properties might opt for wood-fired or indirect-fired boilers, if wood heating is already used. These systems integrate with existing plumbing, providing ample hot water for chores and bathing. Pick proven components and follow a regular maintenance schedule to keep off-grid systems reliable.

Types of non-electric hot water heaters and how they compare

When grid-free hot water is required, multiple practical options are available. This overview helps you understand the trade-offs between compact on-demand units, simple passive systems, and fuel-driven tank solutions. It’s important to match the system to your site conditions, fuel availability, and your comfort with maintenance.

Tankless propane and natural gas choices

Tankless propane water heaters provide hot water on demand. They are available in different sizes, from small units delivering about 2–6 GPM to larger models that can supply 8–10+ GPM for whole-house coverage. These units are compact enough to fit in tight spaces such as mechanical rooms or tiny homes. Ensure proper venting and combustion air when installing in the United States to prevent backdrafts and ensure safe combustion.

Thermosiphon and gravity-fed water heater systems

Gravity-fed thermosiphon systems use simple physical principles for circulation. Because warm water rises and cool water sinks, a passive flow occurs when the storage tank is placed above the heat source. In thermosiphon solar systems, fluid circulates without pumps, resulting in low-maintenance operation. These systems work best when there’s a natural elevation difference and you prefer a pump-free, quiet option.

Indirect-fired and wood-driven water heaters

In indirect-fired designs, a boiler or stove transfers heat to a coil inside a storage tank. This configuration keeps combustion separate from potable water, which lowers corrosion and scaling risks. Wood-fired options include batch boilers and continuous-feed back boilers that heat water directly. Batch systems need scheduled fuel loading and more hands-on tending. Continuous-feed systems operate over longer stretches yet require steady fuel quality and regular ash cleanout.

System type Typical flow/output Best application Maintenance
Tankless propane water heaters Around 2–10+ GPM Tiny homes, cabins, primary homes with good venting Yearly burner and vent inspection
Gravity-fed thermosiphon systems Low to moderate, site-dependent Off-grid solar, simple cottages Minimal; inspect fittings and freeze protection periodically
Indirect-fired (coil-based) systems Output varies with boiler size Homes with existing boiler or wood stove Boiler and coil inspections, water quality care
Direct wood-fired systems Batch: intermittent; Continuous: steady Remote cabins, properties with wood supply Chimney sweeping, ash removal, feed control

Choose a system based on your daily hot water needs, space constraints, and fuel availability. If you prefer minimal upkeep, consider a gravity-fed thermosiphon or a modest tankless propane setup. If you want more independence from fossil fuels and robust performance, choose a wood-fired or indirect-fired system and be ready for additional hands-on care.

How tankless propane water heaters perform and how to install them

Tankless propane units heat water on demand, using flow-activated burners and modulating gas valves. When a tap is opened, a sensor triggers the burner to ignite. The heat exchanger transfers energy directly to the water, ensuring continuous hot water without storage losses. The incoming water temperature affects the maximum flow rate and outlet temperature you can expect.

How tankless units provide on-demand hot water

Flow sensors pick up minor draws and tune the modulating gas valve so heat output tracks the water flow. This maintains a stable output temperature over changing demand levels. Heat exchangers, often constructed from stainless steel or copper, resist corrosion and encourage rapid heat transfer. The result is efficient hot water delivery for showers, dishwashers, and laundry with no tank standby losses.

United States ventilation, safety, and code considerations

Correct venting is crucial for safe system operation. Based on the specific model and location, your installation may call for direct-vent, power-vent, or atmospheric venting. You must also provide enough combustion air and follow carbon monoxide safety guidelines, including alarms in living areas. Many local plumbing and mechanical codes are based on the International Residential Code; always follow local amendments and secure permits and inspections.

Installation tips and common maintenance tasks

Have a licensed plumber or HVAC technician handle gas-line hookups to meet pressure and safety requirements. Keep manufacturer clearances and install the venting components specified in the manual. In hard water areas, use a whole-house water softener or inline filter to reduce scale on the heat exchanger.

Yearly inspections should check burner performance, test for gas leaks, and confirm vent integrity. When mineral accumulation begins to cut flow or temperature gain, descale the heat exchanger. Consistent maintenance keeps non-electric and no-electricity water heaters efficient and extends their service life.

Topic Recommendation Why it matters
Gas-line hookup Hire a licensed professional Helps guarantee proper pressure, leak-free joints, and code compliance
Venting type Follow manufacturer instructions and local code for direct, power, or atmospheric venting Prevents backdraft and CO buildup while helping preserve efficiency
Water treatment Install filter or softener in hard water areas Limits scaling on heat exchangers and keeps flow rates stable
Routine service Annual inspection and descaling as needed Helps maintain performance and avoids early failures
Safety protections Install CO detectors and provide proper combustion air Protects occupants’ safety and satisfies code requirements

Using solar water heaters as alternative water heating systems

Solar thermal technology is a practical method to cut fuel costs and reduce carbon emissions. Rooftop collectors can be connected to existing tanks or used within dedicated off-grid systems. This section compares different system types, covers cold-climate safeguards, and explains how to integrate solar with non-electric backup systems.

Active versus passive system overview

Active solar systems depend on pumps and controllers to circulate heat-transfer fluid from collectors to storage. They offer precise control, higher efficiency in varied sun conditions, and easier integration with large tanks. You can expect more components and a modest electrical draw for the pump and controller.

Passive systems, by contrast, rely on natural convection. Designs such as integral collector-storage units and thermosiphon setups move warm water into a tank without electricity. These systems tend to last longer with minimal maintenance. They work best where roof and tank placement naturally support gravity flow.

Freeze protection strategies and freeze-tolerant designs

In colder climates, freeze protection becomes critical. Drainback systems drain collectors when the pump shuts off, which helps prevent freeze damage. Closed-loop systems use propylene glycol antifreeze and a heat exchanger to safeguard potable water. Freeze-tolerant collectors offer additional resilience during harsh winter conditions.

Choose frost-resistant collectors and components sized correctly for your climate. Routinely check valves, pumps, and glycol concentration to maintain performance and avoid mid-winter failures.

Combining solar thermal with non-electric backup heaters

Pairing solar thermal collectors with tankless propane or wood-fired heaters adds redundancy. Solar manages daily loads and preheats water whenever sunlight is present. On cloudy days or during peak demand, the non-electric backup unit covers the shortfall without relying on grid power.

This hybrid approach is ideal for off-grid water heating solutions and supports energy-efficient systems by reducing fuel use over the year. Design the control strategy so the backup only fires when storage falls below your setpoint.

Eco-friendly and energy-efficient water heating systems

The goal is often to use a hot water solution that limits waste and protects water quality long term. Contemporary manufacturers use advanced materials together with inventive designs. The outcome is efficient non-electric hot water heaters and hybrid systems that require little effort to run. These options significantly reduce your home’s environmental impact while maintaining high performance.

Materials and coatings that reduce bacterial growth and scaling

Some models employ stainless steel tanks or vitreous enamel linings to combat corrosion and limit sediment accumulation. Copper-based heat exchangers and antimicrobial coatings discourage bacterial buildup. Internal tank geometry and inlet diffusers also work to keep sediment away from heating elements, preserving water quality in non-electric hot water heaters and similar systems.

Efficiency-focused design features that reduce waste

Insulated storage tanks and low-standby-loss construction reduce heat loss and cut fuel use. Efficient heat exchangers transfer energy from propane, wood, or solar loops into the water very effectively. Condensing gas-fired units capture latent heat in the exhaust stream to squeeze more energy into the water. Thermostatic controls and smart mixing valves optimize fuel use by maintaining consistent temperatures without excessive overshooting.

Environmental impact and lifecycle factors

Solar thermal systems have virtually zero operational emissions post-installation. Propane and natural gas units, while emitting CO2 during combustion, are cleaner than their predecessors. Wood-fired systems release CO2 and particulates, which depend on fuel quality and how efficiently they burn. You should consider component lifespans: stainless steel tanks can last decades, though some parts may need more frequent replacement. Good recyclability of metals and diligent maintenance can further cut waste from energy-efficient water heating systems.

As you compare systems, think about operational emissions, how durable the materials are, and any waste from maintenance. This perspective helps you pick eco-friendly water heaters suited to your financial plans and sustainability objectives.

How to choose the right no-electric unit for your needs

To choose the right system for off-grid living water heaters, you must take a detailed look at your usage patterns. Small choices now can influence comfort, cost, and installation complexity later. Use the following checklist and table to identify a unit that fits your household’s needs, available space, and fuel options.

Assessing your hot water demand and peak flow

Start by estimating GPM for each fixture likely to operate at the same time. Showers generally use 1.5–2.5 GPM, while kitchen sinks and dishwashers each usually require about 1–1.5 GPM. Add the flows for simultaneous uses to find your peak GPM.

Check what temperature your groundwater enters the system at. Colder water needs higher output to reach comfortable shower temps. Use your desired output temperature and inlet temperature to size both tankless and tank systems correctly.

Checklist for space, venting, and fuel availability

Check available indoor and outdoor installation space and clearances. Confirm vent termination options for combustion units and whether you can meet code-required clearances for manufacturers like Rinnai or Bosch.

Check your on-site fuels, whether that means propane tanks, natural gas lines, or a wood supply. For combined systems, consider whether roof orientation and tilt will support solar collectors. Ensure safe access for servicing and routine maintenance.

Comparing budget ranges and long-term costs

Compare upfront prices and lifecycle costs for common no electricity water heaters. Tankless propane units usually cost less to purchase and install than full solar collector arrays. Solar collectors plus storage tanks demand higher initial investment but lower ongoing fuel costs.

Factor in maintenance, fuel, and expected lifespan. No-electric tank designs with self-cleaning features can reduce descaling and service visits, improving long-term value for remote sites.

System Type Typical Upfront Cost (USD) Estimated Lifetime (Years) Fuel and maintenance notes
Tankless propane unit \$800–\$2,500 10 – 15 Propane supply required; periodic burner cleaning; good for high GPM when sized correctly.
Passive solar collectors + tank \$2,000–\$8,000 15–25 Minimal fuel costs; freeze protection needed in cold climates; roof space and orientation important.
Wood-fired heater (indirect) \$1,200 – \$5,000 15 – 30 Requires steady wood supply; simple mechanics; more frequent inspection and ash removal.
Self-cleaning no-electric tank designs \$900 – \$3,500 12–20 Lower descaling needs; ideal where service access is limited; pairs well with solar or wood backup.

When selecting no-electric unit options, balance peak flow requirements, fuel availability, and site constraints. Prioritize systems that match your daily demand and long-term budget so you get dependable hot water in off-grid living water heater setups.

Non-electric heater safety, code compliance, and maintenance

Choosing a non-electric water heater means prioritizing safety and maintenance alongside performance. Regular upkeep keeps efficiency high and minimizes risk. Knowing local regulations and following basic safety guidelines helps protect your home and family.

Put a seasonal maintenance checklist in place. Check vents and flues regularly to catch blockages or corrosion. Flush tanks or heat exchangers to remove sediment. Check and test pressure-relief valves once a year. Monitor for scale and descale when necessary. Confirm that self-cleaning features operate properly to control bacterial and dirt accumulation.

Apply a few straightforward precautions to keep combustion-based systems safe. Install carbon monoxide detectors near both sleeping areas and the heater location. Maintain open ventilation paths and combustion air supplies. Schedule an annual inspection of burners and heat exchangers with a qualified technician. Store propane cylinders upright and away from living spaces, and keep firewood off the structure and away from vents.

Compliance with local water heater codes is critical. Verify venting rules, combustion air requirements, clearance distances, and any seismic strapping rules. Many jurisdictions mandate permits for gas or wood installations and require final inspections. Before beginning, reach out to your local building department and use licensed contractors for gas and other combustion installations.

For maintaining no electricity water heaters, put a regular service plan in place. Perform monthly visual checks and schedule professional service annually. Keep records of inspections, repairs, and parts replaced. Good maintenance extends system life and catches problems before they cause expensive failures.

Follow manufacturer instructions and national standards such as the National Fuel Gas Code (NFPA 54), along with local amendments. Observing water heater codes and non-electric heater safety practices cuts hazards, keeps you compliant, and supports long-term reliability.

Comparing upfront costs and long-term savings of alternative water heating options

When you’re deciding among propane tankless, solar thermal, and wood-fired or indirect systems, it’s crucial to weigh both upfront costs and long-term savings. Each option carries its own purchase price, installation complexity, and maintenance needs. Items such as roof-mounted collectors, vent runs, and gas-line work heavily affect the final price.

Breaking down initial purchase and installation costs

Tankless propane units usually cost between \$700 and \$2,500. Installation, including gas-line upgrades and venting, can add around \$500 to \$2,000. Solar thermal systems cover a wide price range, with collectors, tanks, and controls running about \$4,000–\$12,000, plus extra roof and piping costs. Wood-fired or indirect systems with a boiler and storage tank typically run \$2,500–\$8,000, depending on materials and installation difficulty.

Fuel costs, operating expenses, and system lifespan

Propane costs vary by region and involves steady annual fuel bills and periodic maintenance. Wood-fired setups need regular fuel handling and a reliable seasonal supply, and can be cost-effective where wood is plentiful and cheap. Solar thermal systems carry negligible fuel costs after installation, though you should budget for occasional pump and control repairs. Lifespans vary: 10–20 years for tankless propane, 15–30 years for solar collectors and tanks, and 15–25 years for well-built wood-fired or indirect systems. Tanks with self-cleaning features often trim maintenance needs and overall lifetime expenses.

Incentives, rebates, and tax credits for eco-friendly installations

In many areas, federal, state, and local incentives can greatly reduce the net cost of energy-efficient and solar thermal systems. It’s important to check the Database of State Incentives for Renewables & Efficiency and contact your local utility about rebates and tax credit opportunities. Incentives often change, so verify current programs before making a purchase.

System Typical Equipment Cost Typical Installation Cost Annual Fuel/Operating Cost Expected lifespan
Tankless propane \$700–\$2,500 \$500–\$2,000 (venting, gas-line) Moderate; depends on local propane prices 10–20 years
Solar thermal \$4,000–\$12,000 (collectors, tank, controls) \$1,000–\$4,000 for roof work and piping Minimal fuel cost; maintenance for pumps/controls 15–30 years
Wood-fired or indirect \$2,500–\$8,000 (boiler, tank) \$800–\$3,000 for chimney, piping, and labor Low to moderate; wood cost and labor 15 – 25 years

Conclusion

You can choose among several practical no electricity water heater options, including tankless propane, solar thermal, thermosiphon, gravity-fed, indirect-fired, and wood-fired systems. Base your choice on climate conditions, fuel access, and everyday hot water needs. Each type comes with trade-offs in installation complexity, physical footprint, and response time.

Off-grid water heating solutions like these deliver obvious advantages. You gain reliability during outages, can save on operating costs, and boost your energy independence. A number of eco-friendly water heaters limit scale and bacterial buildup via advanced materials and passive cleaning, lowering day-to-day maintenance needs.

For a solid choice, consider peak flow rates, vent routes or fuel sources, local codes, and your budget. Consider hybrid setups such as solar paired with a non-electric backup for the best mix of sustainability and reliability. For safety and code compliance, work with a licensed plumber or HVAC professional to size and install your system properly.

Categories
Shopping

Modern Abstract Painting Digital Hybrid Techniques

Modern Sophistication: Today’s Nonrepresentational Canvas Wall Art

“Art helps us discover ourselves and forget ourselves at the same time.” — T. Merton.

Modern abstract canvas pieces shows restrained self-assuredness. It doesn’t seek to impress, yet it remains memorable. This surprising warmth, seen in both digital and painted expressions, defines contemporary wall art. It feels at once intimate and grand.

Galleries like ArtVista regard abstract canvas pieces as a key room-maker. Vivid hues, strong compositions, and textures convert a blank wall into a visual anchor. Whether via modern canvas prints or original paintings, oversized wall art anchors a space. It shows style without being noisy.

Design studios such as Imaginative Studio show that subtle palettes can be striking when used in Bedroom Wall art. Beige, sage, cream, and light brown abstracts blend well with modern, industrial, and Bohemian interiors. AbstractXL curates this selection, helping shoppers discover work that is chic, timeless, and human.

How Modern Interpretive Canvas Art Changes a Room

Modern abstract canvas artwork can profoundly shift a room’s atmosphere and how people interact within it. A single artwork can improve emotional tone, spark memories, and encourage dialogue. The right scale and color palette are key to creating a space that feels deliberate and inviting.

Big Canvas Art

Emotional impact using color, shape, and texture

Colour decisions in contemporary art significantly influence a room’s emotional tone. Vibrant contrasts activate living spaces, while muted pastels quiet bedrooms. Texture adds a tactile dimension, creating a lasting impression for viewers.

Ways modern abstract pieces create focal points in living spaces

Picking the right size for wall art can anchor a room and guide the eye. A large piece over a sofa becomes the main focal point. Big abstract wall art adds visual interest and presence but also functions as a social draw, drawing people into the space.

Real-world responses and human reactions to abstract art

Many buyers find their selections quietly captivating and hard to forget. A collector described a large painting as if it opened a new window at home. Another buyer said a canvas made everyday routines feel more meaningful and welcoming.

AbstractXL and galleries like ArtVista Gallery show how art expresses emotional narratives through composition and color. Imaginative Studio highlights the power of texture and soft pastel colour to shift mood from serene to complex.

  • Pick modern abstract canvas art that fits a room’s purpose.
  • Use big abstract wall art to set scale and anchor furniture arrangements.
  • Choose extra large wall art when you want one decisive statement.
  • Look for large wall art with varied texture that invites closer viewing.

Practical note: picking modern abstract canvas art from trusted sellers can reshape a room’s atmosphere, spark conversations, and turn blank walls into dynamic focal points that support both social and personal experiences.

Exploring Today’s Elegance in Abstract Wall Décor

Contemporary elegance blends chic design with timeless restraint. It’s about balancing bold statements with subtle details. This results in art that starts conversations without taking over the room.

Finding the balance of modern chic and longevity

Contemporary elegance avoids passing fads. It values thoughtful composition, soft colors, and confident restraint. A well-chosen Oversized Canvas Art piece continues to feel polished and relevant over time.

Key elements of visual design that signal sophistication

  • Colour harmony: muted tones such as beige, cream, and sage create calm and invite layering.
  • Texture and depth: mixed textures and subtle brushwork add tactile interest to modern canvas prints.
  • Balanced composition: negative space and focal contrast help a piece read from across a room.

How AbstractXL builds pieces that feel human and memorable

AbstractXL focuses on art with emotional depth and personal resonance. Their curators choose materials such as archival canvas and museum-grade prints for longevity.

They offer everything from intimate modern canvas prints to extra large wall art. Each work is chosen to feel approachable, lasting, and human, not loud or disposable.

“The art doesn’t shout; it stays with you,” a buyer said about a recent collection.

This human response shapes the selection. Pieces that invite a second look, suggest a story, or pair well with existing decor are favored. The outcome is practical contemporary wall art fused with the emotive pull of abstract canvas art.

Modern Abstract Canvas Art

Modern abstract canvas art today blends bold concepts with refined technique. It invites viewers to pause, observe, and interpret on their own terms. This overview examines the essence of these works, the value of canvas, and the styles that captivate homes and offices.

Core characteristics of modern abstract art

These pieces frequently use nonrepresentational forms and layered complexity. Artists employ dynamic brushstrokes or digital techniques to evoke movement and mood with Abstract Wall Art.

Striking colour schemes and varied textures invite repeat viewing. Viewers commonly find these canvases both invigorating and thought-provoking.

Why canvas boosts color richness and texture

Canvas absorbs pigments differently than paper, intensifying color and creating a three-dimensional effect.

The canvas surface provides a tactile experience that interacts with light in different ways. Galleries prefer canvas because it supports gallery-style mounting and long-term display.

Popular styles within modern abstract canvas art

Soft pastel abstracts suit bedrooms and serene spaces. They use soft hues and gentle transitions to create a calming atmosphere.

Bold color blocks and high-contrast compositions create strong focal points in living rooms. They anchor the room and pair well with modern canvas prints for a layered effect.

Mixed-media and textured layers add personal character and depth. This approach helps abstract canvas art feel uniquely handcrafted, even when digitally created.

Selecting the Right Size: Oversized Wall Art and Oversized Wall Decor

Choosing the right size is key to setting the tone in any room. A well-chosen piece adds balance and presence without overwhelming the space. This section offers practical tips for selecting extra large wall art and big canvas art. It includes tips on placement and how scale affects perception.

Room scale guidelines for extra large wall art and big canvas art

Artwork should cover roughly 60–80% of the wall space above furniture for pleasing proportions. For sofas, aim for a piece two thirds the length of the seating. Alternatively, use a coordinated gallery of matching pieces to span the sofa.

In dining spaces, a long horizontal canvas above a buffet makes a confident statement. Hallways benefit from elongated works that guide the eye. High-ceiling rooms can handle one oversized piece that stands out.

Placement tips for oversized wall décor in living rooms and offices

Anchoring a living room with large wall art above the sofa creates a focal point. Position the artwork’s centre at eye level, around 57–60 inches from the floor. Adjust if ceilings are unusually low or high.

In offices, big canvas art can energize or inspire. Place a bold composition behind a desk or opposite the entrance to encourage creativity. For open-plan areas, use oversized works on partial walls to help define zones.

How an oversized piece changes room perception and movement

Large-scale wall decor can ground a room by establishing a clear reference point. Placing artwork a bit higher than usual can increase perceived ceiling height. Wide, horizontal large wall art can visually stretch narrow rooms.

Custom sizing from makers like AbstractXL ensures precise matching of proportions. Tailoring a piece ensures the scale supports traffic flow and sightlines while achieving the intended visual impact.

Big Abstract Wall Art for Living Rooms & Bedrooms

Choosing the right big abstract wall art can transform a room’s ambiance. Living rooms call for bold colours to energise social gatherings. Bedrooms, on the other hand, benefit from softer hues to promote rest and recovery.

Selecting palettes for living rooms versus bedroom wall art

In living rooms, go for contrasting colors and statement hues that spark conversation. A large wall art piece with deep blues, warm ochres, or high-contrast black and white can anchor seating and define the space.

Bedrooms, by contrast, benefit from muted tones that reduce visual stimulation. Soft creams, sage green, and warm beige create a calming atmosphere. A good big canvas art choice can make the bedroom feel curated yet calm.

Gentle, soothing abstracts for sleep spaces guided by pastel trends

Pastel abstracts are perfect for modern, industrial, and Bohemian bedrooms. They offer subtle washes of colour and gentle texture to support sleep and relaxation. These compositions feel like bedroom wall art that soothes and still looks stylish.

Light brown and dusty rose details work well with natural wood and linen bedding. An oversized pastel work can shape a restorative nighttime routine.

Using big abstract wall art as the centerpiece above couches or bedheads

  • Place a single oversized canvas above a sofa to anchor seating and guide sightlines.
  • Place one large wall art piece above the headboard to define the sleeping zone.
  • Use furniture scale to guide the canvas size so big canvas art feels balanced with sofas and beds.

AbstractXL and similar specialists can advise on scale and palette to match furnishings and bedding. One well-placed large wall art piece becomes the focal point and ties together color and texture across the space.

Creating a Unified Look with Modern Wall Art and Modern Canvas Pieces

Arranging contemporary wall art requires a deliberate, calm balance. A single large work can ground a room. Smaller works add rhythm, ensuring they don’t steal the show.

Blending scales

Combine a big canvas art statement with two or three smaller prints. Vary their heights to guide the eye. Using varied orientations creates a curated gallery feel.

Coordinating colors and textures

Draw inspiration from a large abstract to match pillows, rugs, and curtains. This unifies the space. Pair matte canvas with soft textiles or gloss frames for contrast. Pastel abstracts complement neutral linens to maintain a soothing palette.

Framing and mounting for a polished finish

Float frames give modern prints a gallery-ready feel. Stretched canvas with clean edges suits minimalist spaces. For large pieces, sturdy mounting and slim frames keep attention on the artwork.

AbstractXL provides personalized advice on finish and scale. This ensures large wall art complements both room size and style. Thoughtful choices in scale, color, and mounting make the art feel integrated, not added.

Custom Canvas Art and Personalization Options from AbstractXL

AbstractXL serves homeowners and businesses looking for art that complements their space and vision. Their approach simplifies the process of requesting specific dimensions, selecting a color palette, and choosing finishes. These options suit both modern and classic interiors.

Ordering to suit a defined colour palette or size

Clients may upload room photos or share paint swatches. AbstractXL then recommends scale options for oversized wall art that complements the room without dominating it. Precise sizing is essential for tall-ceiling spaces or narrow walls.

Steps that ensure quality — proofs, materials & finishes

Before production, buyers get a digital proof to check colour accuracy and composition. Options can include museum-grade canvas, archival pigment inks, and mixed media textures.

Samples and finish mockups allow clients to envision the final piece. This step minimizes surprises and boosts confidence in the artwork.

Real-world examples: commissions across homes and commercial spaces

A Seattle coffee shop commissioned oversized wall decor with deep, moody tones to create a warm gathering spot. A Miami office chose AbstractXL custom art to cover an entire lobby wall, conveying brand energy immediately.

Home commissions often focus on living rooms and bedrooms, with extra large wall art as the focal point. Commercial projects balance durability and style, selecting materials that withstand heavy foot traffic while preserving color depth.

  • Request a custom proof to confirm colour match before printing.
  • Choose archival inks for longevity in sunlit rooms.
  • Specify exact dimensions to avoid re-framing or modifications.

Budget-Friendly Big Art: How to Find Value Without Compromising Style

Large wall art can transform a room without breaking the bank. Buyers looking for modern abstract canvas art should weigh size, materials, and the artist’s process when judging price. Galleries such as AbstractXL and ArtVista Gallery provide clear descriptions to simplify comparisons.

How pricing reflects size, materials, and the artist’s process

Size is a big driver of cost. A 60-by-90-inch original will be more expensive than a same-size print. Materials also influence cost. For instance, a stretched gallery canvas with archival inks or mixed media elements is more valuable than poster paper. The time and labour involved, including layering techniques and hand-applied texture, also raise the price.

Strategies for sourcing affordable big art and big canvas art

  • Look for gallery-curated prints and limited-edition runs to get high quality at lower cost.
  • Choose gallery-wrapped canvas prints for an original-like look without the original price.
  • Watch seasonal sales from reputable stores like AbstractXL and ArtVista Gallery to find affordable big art with archival inks.
  • Consider local art fairs and student shows for unique large wall art at beginner-friendly prices.

When to buy originals vs. high-quality prints

An original is worthwhile when texture, provenance, and resale value are priorities. Originals deliver unique depth that prints can’t truly match. Prints are a smart choice when you want dramatic scale and impact on a budget.

For many buyers, mixing originals and prints is the practical option. Combining one original focal work with high-quality prints can build a curated look and extend your budget. This approach allows for both large wall art and modern abstract canvas art.

Creative Wall Art Ideas: Combining Abstracts with Other Décor

Pairing big abstract wall art with soft textiles and reflective surfaces creates immediate depth and warmth. A textured throw or wool rug beneath extra large wall art helps anchor the eye. Mirrors placed beside a canvas multiply light and make small rooms feel open.

Layering works best when materials differ. Combine linen pillows, a metal sculpture, and a wooden side table near a contemporary wall art canvas to mix finishes without clutter. Small brass or matte black accents add rhythm and repeat tones from the painting.

To build a gallery wall, start with a large abstract as the anchor. Surround it with smaller modern canvas prints, framed photos, or slim sculptural pieces. Vary orientations and use set-of-2 pairings when symmetry is needed.

  • Choose one dominant colour from the anchor piece to carry into smaller works.
  • Mix horizontal and vertical formats to balance negative space.
  • Allow breathing room so each item reads as part of a unified whole.

Retail and hospitality spaces benefit from confident choices. A café can set the tone with big abstract wall art behind the counter to signal atmosphere and brand personality. Offices often prefer extra large wall art in meeting areas to inspire teams and soften acoustic panels.

Select durable substrates and changeable prints for high-traffic zones. Modular systems let teams change panels seasonally without a full refit. This approach keeps contemporary wall art fresh and aligned with evolving decor needs.

When mixing scales, think of the room like a grid. Place the large piece first, then distribute smaller pieces to support it. This approach makes unique wall art feel planned and keeps sightlines clean.

Materials, Care & Installation for Large Wall Art

Choosing the right materials and a good care routine ensures big canvas art stays vibrant for years. This brief guide explains common materials, safe hanging techniques, and basic maintenance for oversized wall décor. It offers practical advice for both home and studio settings.

Common materials and benefits.

Stretched cotton and linen canvases are popular for modern abstracts thanks to their warm texture and deep color. Gallery-wrapped edges remove the need for frames and present a sleek, modern look. Prints typically use archival pigment inks on canvas to resist fading and preserve color accuracy.

Hanging methods for security and balance.

  • French cleats provide secure, level support for large wall art and big canvas art. They spread weight evenly and make repositioning simple.
  • Heavy-duty picture hangers or toggle anchors work well for drywall when studs can’t be used. Ensure the chosen hardware can support the artwork’s weight.
  • Position the artwork’s center at about 57–60 inches from the floor. Adjust slightly when placing above furniture to ensure visual balance.

Care & preservation tips.

Gently dust canvases with a soft brush or dry microfibre cloth. Avoid direct spraying of cleaners. Keep large wall art out of direct sunlight to prevent fading. Maintain stable humidity levels to prevent warping or mold.

When professional help is needed.

For original paintings with flaking paint, stains, or structural issues, seek professional conservator help. Restoration experts use high-grade materials and methods to safeguard the artwork’s value and integrity.

Fast checklist for installation and upkeep.

  1. Ensure the artwork weight matches or exceeds the chosen hardware rating.
  2. Use studs or suitable anchors to mount securely.
  3. Measure to set the artwork’s visual center at eye level and adjust for furniture height.
  4. Dust weekly and avoid direct sunlight or damp environments.

Adhering to these guidelines ensures that large wall art and big canvas art remain in optimal condition. Good material care and safe installation extend the lifespan of oversized wall décor while preserving the artist’s vision.

Where to Buy: Finding Contemporary Wall Art That Feels Personal

For those seeking inspiring pieces, understanding how to search and decide is key. An ideal seller offers clear descriptions, practical filters, and custom sizing choices. This simplifies choosing modern canvas prints that match both room and mood.

What to expect from specialist shops like AbstractXL

Specialized sellers showcase curated selections that highlight human emotions. AbstractXL provides custom sizing, color matching, proof steps, and clear material notes. They provide a range spanning modern canvas prints to extra large wall art, prioritising emotional impact.

How galleries and online stores describe color, size, and subject to help shoppers

Trusted galleries such as ArtVista Gallery provide detailed product notes. They explain the palette, mood, and ideal placement. Descriptions list orientation—vertical, horizontal, or square—along with recommended rooms. These details help buyers picture big abstract wall art in their spaces.

Using filters to narrow big abstract wall art options

  • Color filters: beige, blue, colorful, grey to suit your decor.
  • Subject filters: landscape, ocean, abstract to refine themes.
  • Shape and orientation: vertical, horizontal, square, or multi-set options.

Using these filters makes the search faster. Shoppers can set size ranges to find extra large wall art or search for affordable big art without compromising quality.

Wrap-Up

Modern Abstract Canvas Art transforms spaces, adding emotional depth and visual focus. Whether it’s soft pastels in a bedroom or vibrant colors in a living room, it sets the mood and grounds the space. Canvas texture and size significantly shape a room’s atmosphere and function.

AbstractXL simplifies choosing with curated pieces, custom art, and high-quality materials. They provide detailed proofs and finishes, aiding in the selection of the perfect palette and size. Customer testimonials show how one large piece can complete and personalise a room.

When buying large art, consider scale, colour, materials, and placement. Thoughtful decisions ensure the artwork not only looks impressive but also enriches daily life. With the right choices and a reliable source, modern canvas prints and original paintings become core parts of contemporary wall art, influencing daily life.

Common Questions

What creates contemporary elegance in modern abstract canvas art?

Contemporary elegance comes from blending chic design with timeless appeal. It involves considered colour palettes, layered compositions, and subtle textures. This creates a refined aesthetic that is both modern and enduring. AbstractXL selects pieces with nonrepresentational forms, expressive mark-making, and striking color choices. Each canvas acts as a refined focal point for a room.

How does modern abstract canvas art transform a room?

Modern abstract art brings energy, emotion, and personality to a space. It uses color, form, and texture to create a focal point that guides sightlines and sets the mood. High-contrast palettes energize living rooms, while softer palettes soothe bedrooms. A properly sized piece transforms an empty wall into a conversation starter that defines style.

How do colour, form, and texture drive emotional impact?

Colour choices strongly influence mood—high-contrast palettes feel vibrant and social, while pastels feel soothing and restorative. Form and composition hint at movement or stillness. Visible texture adds a human touch, making the piece inviting to revisit. Buyers often describe these effects as quietly captivating or surprisingly personal.

What do buyers say about the human feel of modern abstract work?

Many buyers describe modern abstract pieces as intimate and memorable. Comments such as “It’s not trying to impress you. That’s what makes it unforgettable,” and “I didn’t expect something digital to feel this human,” reflect the emotional attachment created by layered textures and thoughtful composition.

What are the key characteristics of modern abstract canvas art?

Key traits include nonrepresentational forms, layered compositions, energetic brushwork or digital mark-making, bold palettes, and textural variation. These elements encourage repeated viewing and serve as both visual anchors and emotional touchpoints.

Why pick canvas instead of paper or posters?

Canvas enhances color saturation and depth, providing a tactile texture that interacts with light differently than paper. It offers a gallery-ready look, perfect for oversized wall décor. Canvas prints offer almost the same visual impact as originals while being more affordable.

What popular styles should buyers consider?

Popular styles range from soft pastel abstracts for calm bedrooms to bold color blocks for living-room focal points and mixed-media textured layers for extra depth and a human touch. Each style meets different design needs and room functions.

What size rules help with extra large wall art or big canvas art?

Follow room-scale guidelines: artwork should fill around 60–80% of the wall above furniture. For a sofa, aim for a piece around two-thirds the sofa length or build a coordinated gallery grouping. AbstractXL offers custom sizing to match wall proportions and desired impact.

Where should oversized wall décor go for best effect?

In living rooms, place a large piece above the sofa to create a gathering focal point. In offices or lobbies, oversized pieces energize the space; in hallways, elongated formats guide sightlines. Hang art with the visual centre around 57–60 inches from the floor, adjusting for furniture height.

How can an oversized piece change room perception and flow?

An oversized canvas can anchor a room, visually widen spaces with horizontal formats, or increase perceived ceiling height when hung slightly higher. Large art sets scale and rhythm, helping rooms feel curated.

How should color palettes differ between living rooms and bedrooms?

Living rooms typically suit bolder contrasts or statement colors to energize social spaces and start conversations. Bedrooms call for soothing palettes, including beige, cream, sage, and light brown pastels, to encourage restfulness and calm.

Can big abstract wall art serve as a centerpiece above sofas or headboards?

Yes, absolutely. A single oversized canvas above a sofa or headboard anchors furniture and defines the room’s style. AbstractXL can advise on scale and palette to complement upholstery, bedding, and textiles.

How do I mix scales with modern canvas prints and smaller pieces?

Pair an extra large statement canvas with smaller supporting prints or a set of two to create hierarchy. Staggered groupings and coordinated colour threads help the arrangement feel curated. Anchoring a gallery wall with a large abstract and surrounding it with smaller works balances scale.

How should colors and textures be coordinated across a room?

Pull accent colours from the artwork into pillows, rugs, and small décor. Echo texture cues by pairing matte canvas with soft textiles or mixed media with tactile throws for cohesion. Pastel abstracts pair well with neutral textiles and natural materials.

What framing and mounting options give a polished finish?

Float frames create a gallery-ready look, while clean-edged stretched canvas suits minimalist interiors. AbstractXL offers mounting recommendations and frame options tailored to finish and scale to ensure the presentation aligns with room style.

Can AbstractXL make custom art for my space?

Yes, it can. AbstractXL accepts custom colour and size requests to suit specific interiors. Customers get proofs, material options (canvas types, archival inks), and finish selections to confirm color accuracy and the right texture before production.

What quality controls does AbstractXL use for custom orders?

AbstractXL provides proofs, clear material descriptions (stretched cotton or linen canvas, archival pigment inks), and finish options. These steps ensure the final artwork meets expectations for color, texture, and scale before dispatch.

What kinds of custom commissions are common for homes and commercial spaces?

Custom commissions range from extra large wall art for living rooms to tailored pieces for boutique hotels or coffee shops and large works for offices. These projects are sized and finished to transform atmosphere and suit specific practical needs.

How does pricing relate to size, materials, and the artist’s process?

Pricing grows with size, premium materials (gallery-wrapped stretched canvas, archival inks, mixed-media textures), and originals due to unique labour and potential resale value. High-quality prints provide a cost-effective way to get large-scale impact without original pricing.

How do I find budget-friendly big art that still looks great?

Look for gallery-curated prints, limited-edition runs, and museum-quality canvas prints on gallery-wrapped frames. Shops like AbstractXL and reputable galleries balance quality and price by providing high-quality reproductions alongside originals and transparent material descriptions.

When do originals make more sense than premium prints?

Choose originals for unique texture, collector value, and resale potential. Select museum-quality prints for affordable large-scale impact. The decision depends on budget, intended longevity, and desire for uniqueness.

How can large abstracts be layered with other décor?

Layer art with textured throws, rugs, and sculptural objects to create depth. Mirrors next to artwork amplify light and expand perceived space. Match metallic or wood accents with the canvas palette to strengthen the overall look.

How do I build a gallery wall around a large abstract?

Use one large abstract as the anchor and place smaller modern canvas prints or photographs around it. Use consistent spacing, align key horizontals, and repeat a shared color thread to keep the grouping cohesive.

How can commercial spaces use big abstracts well?

Bold abstracts drive brand personality and atmosphere. Use durable materials in high-traffic areas and consider modular or swap-friendly prints to keep displays evolving. Large statement pieces can create memorable backdrops for customer engagement.

What materials are commonly used in modern abstract wall art and their benefits?

Common materials include stretched cotton or linen canvases, archival pigment inks for prints, and mixed-media textures. Canvas offers deeper colour saturation and a tactile surface; archival inks support longevity. Gallery-wrapped edges give a clean, original-style finish.

How should one hang extra large wall art safely?

Use suitable anchors, French cleats, or heavy-duty picture hangers rated for the artwork’s weight. Position the visual center about 57–60 inches from the floor and adjust for furniture height. For especially large pieces, professional installation can ensure secure mounting.

What’s the best way to care for canvas prints and original paintings?

Gently dust canvases with a soft brush or microfiber cloth. Avoid direct sun and humid areas to prevent fading or warping. For originals or delicate mixed-media surfaces, a professional conservator can advise on cleaning or restoration.

What do specialist sellers like AbstractXL offer?

Shoppers can expect curated selections that emphasize emotional depth, human-feeling work, and quality materials. AbstractXL provides custom size and color options, proofs, clear material notes, and a range from modern canvas prints to extra large wall art supported by detailed descriptions.

How do galleries and online shops describe color, size, and subject to help buyers?

Reputable galleries provide context on material, recommended placement, palette, orientation (vertical, horizontal, square), and suggested room use. Clear product descriptions and visuals help buyers envision scale and mood before purchase.

How do filters help narrow big abstract wall art choices?

Use color filters like beige, blue, colorful, or grey, plus orientation and style filters such as pastel abstracts, bold blocks, or mixed media to quickly match room needs. Many galleries also allow filters for size, set options, and price.

Categories
Shopping

How to Personalize Your Joahinia Diamond Pendant

Joahinia Diamond Necklace: Introducing Timeless Grace.

Sometimes, a special piece of jewelry can change how we perceive ourselves. The first time I held a brilliant diamond to the light, I felt a subtle confidence—an intimate celebration. For many in Singapore, a Joahinia diamond necklace offers that sensation. It adds polish to any outfit and signifies a special moment with elegance.

Here we present Joahinia’s diamond necklace as a leading option within luxury diamond pendant – Joahinia. We’ll look into its craftsmanship, gemstones, and unique design—qualities that make the Joahinia diamond necklace a standout for collectors and fashion lovers in Singapore.

We’ll give you a detailed guide on Joahinia—including the brand’s story, design choices like the Joahinia diamond pendant, and material options. We’ll talk about ethical sourcing and the debate between lab-grown and natural diamonds, plus tips on styling, care, pricing, and where to buy in Singapore. We’ll show how to coordinate Joahinia diamond earrings with necklaces for a refined look.

In Singapore, there’s a high demand for personalized and striking jewelry. Whether shopping in-boutique or online, this guide helps you grasp materials, designs, and care so you can improve your personal style.

About Joahinia: Brand Story and Designer Necklaces

Joahinia started with a mission to marry modern style with heritage jewelry skills, focusing on excellent workmanship, careful gem selection, and bespoke service for refined customers in Singapore and worldwide.

Joahinia's diamond necklace

Origins & Vision

From the start, Joahinia aimed to create unique designer necklaces—merging old-world skills with new designs to deliver jewelry ideal for special days and day-to-day grace.

Signature Design Language

Joahinia favours sleek shapes and a mix of simple and bold pieces. Solitaire and halo settings frequently appear, giving diamond pendants and necklaces an elegant look—an eye for detail that shows dedication to excellence.

Market Positioning: Luxury Jewelry & High-End Accessories

Positioned among premier houses, Joahinia offers both RTW and bespoke pieces with high-grade gems, appealing to Singapore’s discerning buyers.

What Makes a Joahinia – diamond necklace Unique

From concept sketch to final polish, Joahinia merges artistry with finish, yielding distinctive, lasting pieces.

Exquisite Craftsmanship & Designer Influence

Precision settings and finish details define Joahinia’s difference. Microscope-guided, traditional setting and edge finishing—bevelled prongs, hidden settings—transform pieces into treasures.

Trend-aware, Joahinia pairs comfortable chains/clasps with striking presence suitable for everyday and events alike.

Gem Selection: Lab-Grown and Natural Diamonds

Joahinia picks high-quality gemstones with focus on cut, clarity, and color, offering both natural and lab-grown diamonds to fit customer preferences.

Lab-grown diamonds look much like natural ones, usually cost less, and have clearer origin; natural diamonds are traditional with established heritage. Both let buyers choose by story, budget, or provenance.

Design Signatures for Statement Pieces

With balanced geometry and centered stones, pendants sit correctly and pair across wardrobes.

Statement jewelry focuses on refined design rather than flashy excess—layered or single bold pendants aim to reflect the wearer’s style, balancing size and sparkle.

Materials and Gemstone Quality in Joahinia’s Diamond Necklace

Joahinia blends heritage elegance with modern transparency in its diamond necklaces, emphasizing material and gemstone quality—crucial to beauty and value. Singapore buyers can learn grading, metals, and ethical sources from trusted sellers.

Diamond Grading Basics

Diamond grading evaluates carat, cut, color, and clarity; carat is weight and drives price, yet appearance depends on cut quality—Joahinia selects superior cuts to maximize sparkle.

High color and clarity underpin appearance; GIA/IGI reports substantiate Joahinia’s selections.

Metal Choices & Practicalities

18K gold (yellow/rose/white) and platinum are offered; platinum’s heft and durability suit daily wear and sensitive skin.

Gold offers aesthetic range and value—rose/yellow warmth; white gold with rhodium brightness; alloys add strength.

Ethical sourcing and retail integrations

Ethical sourcing is increasingly important; retailers use tools to help select lab-grown by origin/quality, simplifying choices and supporting conscious buying.

Retail platforms provide filters/builders to compare natural vs. lab-grown with certificates and origin info—transparency builds trust and alignment with principles.

Design Variations: Joahinia – diamond pendant & Necklace Styles

From minimalist to statement, Joahinia styles fuse timeless elegance with modernity for everyday and event wear alike.

Solitaire pendants stay iconic; halo settings encircle the center with accents for a brighter, larger appearance without losing refinement.

For more presence, three-stone, cluster, and station designs offer vivid looks—visualized easily with retailer previews.

Bespoke options let you choose every detail—from stones to chain—Joahinia designers guide your vision into a precise necklace.

A trend mixes simple pendants with bold necklaces—often the single diamond pendant plays the star—layered or solo for standout impact.

Whether you prefer solitaire, halo, multi-stone, or custom depends on style and occasion—minimal calls for solitaire; extra sparkle suggests layering or multi-stone.

Coordinating Sets with Joahinia – diamond earrings

Pairing a necklace with the right earrings polishes the whole outfit; Singapore’s luxury market prizes harmony, letting shoppers confidently mix Joahinia with other high-end accessories.

Creating Harmony Between Pieces

Start by matching metal tones—gold or platinum across necklace and joahinia – diamond earrings looks cohesive. Shape matching helps too: round pendants with round studs, etc.

Shared details (halo/bezel/pavé) tie sets together visually.

Popular earring styles that pair with Joahinia necklaces

  • Studs: Solitaire or halo studs suit daily wear and spotlight a bold pendant.
  • Drop styles offer event-ready elegance and suit elongated necklaces.
  • Small hoops with pavé: Trendy and easy to coordinate with modern pendants and various necklaces.

How to Keep a Set Cohesive

Buying coordinated sets ensures perfect matches; when purchasing separately, consider a custom consult so craftsmen align clasps, polish, and proportions.

If mixing brands, anchor on a common element (metal or shape) so neither your necklace nor diamond earrings – joahinia dominates.

Styling Tips for Wearing a Joahinia’s Diamond Necklace

Match the moment—solitaire for weddings, statement for galas, minimalist pendant for everyday elegance.

Match necklace to neckline: V-necks work with pendants near the heart; chokers/collars pair with crew necks; bold statements love strapless silhouettes.

If layering, let the Joahinia lead; keep other jewelry minimal for balance.

Mix metals carefully: stick to two tones in similar families (rose + yellow, or white + platinum) for a harmonized look.

Layer like a pro: vary lengths/styles—start with a fine choker, add a Joahinia pendant, then a slightly longer chain—focus on one main piece and keep others simpler.

Consider climate: lighter daytime choices, more substantial evening pieces for maximum sparkle.

Care & Maintenance for Joahinia Necklaces

Keep your necklace shining with simple home care—regular cleaning stops buildup and keeps the finish fresh; frequent wear benefits from pro checks to protect settings and restore sparkle.

Cleaning Routines for Diamonds & Settings

Warm water + mild soap + soft brush does the job; rinse and blot with a lint-free cloth.

Avoid ultrasonic cleaners on delicate or intricate pieces unless a jeweler approves; gentle, frequent cleaning prolongs life and beauty.

Storage best practices to preserve craftsmanship

Use individual pouches/compartments to prevent scratches and tangles; avoid contact with harder gems.

Anti-tarnish aids for gold; dry storage for platinum—less polishing, longer luster.

Signs You Need Re-Tipping or Service

Inspect prongs/clasps/chains periodically; address looseness or wear immediately.

Schedule yearly or twice-yearly service for re-tipping, tightening, rhodium refresh, and polishing.

Where to Buy in Singapore — Retail, Online, Bespoke

In Singapore, shop luxury boutiques for tailored service or authorized dealers for private viewings and hands-on assessment.

Orchard Road, Marina Bay Sands, and Club Street host high-end retailers—often by appointment—whose teams help with metals, chain lengths, and stones.

Online ordering has advanced: platforms offer real-time stone/setting views, letting you compare and curate favorites for in-store visits. Modern online tools preview stones/settings in real time so you can shortlist before visiting.

Customization tools clarify the process for rings and necklaces, rendering detail selection easier.

Some boutiques blend online and in-store—start the design online, then see it in person; shops may hold your selected stone while you arrange a visit.

Bespoke consultations align design intent, sourcing, budget, and schedule from sketch to delivery.

Hands-on samples and diamond viewing inform durability choices and confidence.

Expect transparent schedules, staged payments, and coverage options.

Preparation (references, sizing, metals) speeds and clarifies customization.

Whichever route you take, Singapore offers many paths—from local stores to online design—to find or create something unique.

Understanding Price & Value for Joahinia

We outline what affects pricing so you can budget wisely and weigh enduring value against immediate aesthetic.

What Determines Price: Carat, Cut, Setting, Brand

Carat and cut dominate price; with quality cut, modest carat can outshine larger stones. Color/clarity also matter.

Platinum > 18K gold typically; detailed settings increase craftsmanship time and price.

Brand prestige adds value—Joahinia’s craftsmanship and design identity contribute a premium recognized for rarity and regard.

Thinking Investment or Fashion

Classic cuts + reputable brands typically sustain resale interest.

Bespoke items can be deeply meaningful though niche in resale.

Durability depends on materials and build: platinum and strong settings are longer-lived; good care helps preserve value and look.

What Customization Does to Price

CAD work, rare stones, special alloys, and hand finishes add cost.

Get estimates early and itemize upgrades to prevent budget shocks.

Weigh now-impact vs later value across 4Cs, brand, resale, and custom scope.

The Joahinia Customer Journey

Joahinia makes luxury buying smooth online and in-store—clear steps, responsive staff, and reliable web tools help Singapore shoppers trust their purchase; streamlined e-commerce eases discovery and customization.

Importance of responsive support and smooth integration for online shoppers

Fast expert answers convert browsers into buyers—whether about lab-grown, sizing, or shipping—while seamless platforms integrate inventory and customization (e.g., VDB Ring Creator) so availability is clear.

Examples of Smooth Implementation & Happy Clients

Post-implementation wins include smoother sites, faster custom fits, diligent follow-ups, and quicker stone sourcing credited to attentive teams.

Support After the Sale

Aftercare typically includes periodic checks, cleanings (free/paid), and clear manufacturing warranties; long-term ties mean help with enhancements or repairs—strong warranties and dependable service are crucial for ongoing satisfaction.

Bringing It All Together

The Joahinia diamond necklace excels in craftsmanship and design—from delicate pendants to bold pieces—each showcasing fine gemstones and expert metalwork; clear diamond grading helps Singapore buyers make informed choices.

When choosing, verify certifications; decide between lab-grown and natural based on budget and values; consider customization or bespoke for personal fit; always buy from authorized dealers or trusted sites for safety and accurate details.

Use aftercare/warranties to preserve beauty; try pieces in-person in Singapore to confirm fit and quality for a lasting, confident purchase.

Categories
Shopping

CITEC – UPS: Power Protection for Airports and Transportation Hubs

CITEC – UPS: Reliable Power Backup Solutions

Wondering what the impact would be on critical operations during a power outage? It starts with understanding the crucial role of an uninterrupted power solution. CITEC – UPS offers reliable power backup solutions that are crucial for keeping power quality for many use cases. With a focus on engineering quality and reliability, CITEC – UPS supplies advanced systems tailored for multiple sectors, ensuring that your data and essential equipment remain secure. As a recognized leader in https://citecinternational.com.sg/uninterruptible-power-supply/ power management in the United States, see how CITEC – UPS can shield your operations from unplanned interruptions.

Understanding the Uninterruptible Power Supply (UPS)

An uninterruptible power supply is a critical device that maintains the uninterrupted operation of electronic systems through outages and voltage events. These devices play an essential role in server rooms, data centers, and computer rooms, where data protection and equipment functionality are top priorities.

UPS technology uses rechargeable batteries that engage instantly when the main power source fails. This immediate response lets users save work and avoids potential data loss. In addition, uninterruptible power supplies safeguard against voltage surges, helping avoid costly harm to sensitive gear. Organizations relying on CITEC – UPS systems gain robust power management solutions that provide peace of mind in maintaining uninterrupted operations.

Why CITEC – UPS Matters

The impact of CITEC – UPS extends past basic backup in power backup scenarios. It serves as a central component in upholding business operations for various industries. When power interruptions hit, the consistency of a CITEC – UPS system ensures that essential equipment remains operational and protects valuable data from potential loss. Businesses can rely on these systems to keep performance steady, so teams can focus on core work without the looming threat of power failures.

CITEC's uninterruptible power supply

Keeping Operations Running and Data Safe

Operational reliability depends on effective backup, and CITEC – UPS excels in this aspect. In sectors such as telecom, finance, and healthcare, where every second counts, the advantages of CITEC – UPS become evident. By safeguarding data and sustaining equipment functionality during outages, businesses can preserve reputation and service commitments. The ability to maintain uninterrupted performance drives enhanced productivity, reducing downtime and strengthening confidence in technological investments.

CITEC – UPS: How It Works

The functionality of CITEC – UPS systems is anchored in their ability to deliver dependable power management. These systems constantly watch the main power supply, reacting swiftly to any interruptions. The CITEC – UPS operation executes a smooth changeover to internal batteries, keeping power flowing even during an outage. This capability is vital for protecting sensitive equipment and data.

Core Components & Functions

The core components of CITEC – UPS systems contribute significantly to their strong performance. Each unit features:

  • Battery Unit: Stores energy to provide backup power during an outage.
  • Inverter: Transforms battery DC to AC output.
  • Control Electronics: Oversee operations to maintain performance.

The double conversion topology employed in these systems guarantees that the incoming power is always converted—yielding a clean, stable output that allows connected devices to run consistently whether or not external power is present.

Component Function Importance
Battery Unit Holds reserve energy Keeps systems running through outages
Inverter Converts DC to AC power Ensures compatibility with devices
Control Electronics Monitors and manages operations Maintains overall system reliability

Benefits of Using CITEC – UPS Systems

The integration of CITEC – UPS systems into your operations offers a range of advantages, improving both data security and equipment longevity. Businesses increasingly rely on these devices to protect from power disturbances that could threaten sensitive equipment and critical data.

Data Safety and Hardware Life

One of the key benefits of CITEC – UPS is its ability to deliver enhanced data security. By providing a stable power supply, these systems avoid data loss caused by sudden outages—vital for industries where information integrity is paramount, such as finance and healthcare. Ensuring uninterrupted power helps maintain continuous operations and reduces risks associated with data corruption.

Besides data protection, CITEC – UPS systems improve equipment longevity by protecting devices from power surges and fluctuations. This prolongs the lifespan of essential machinery. Dirty power accelerates wear, driving expensive replacements. A reliable backup power solution reduces this risk, allowing for more consistent performance and reduced maintenance requirements.

Overall, the benefits of CITEC – UPS systems are compelling: organizations can realize improved data security, lower the likelihood of equipment damage, and ultimately promote operational efficiency.

Industry Solutions by CITEC – UPS

CITEC – UPS solutions are designed to cater to the varied power needs of various sectors. Different industries encounter unique power challenges, and CITEC understands the importance of customized approaches. This enables clients to keep operations running and protect crucial data across IT, healthcare, manufacturing, and telecom.

Use-Case-Specific Applications

In healthcare, power systems for industries must prioritize reliability. CITEC – UPS systems ensure that critical medical devices stay online during outages, safeguarding patient data and supporting safety. IT environments demand uptime for data integrity; CITEC’s solutions deliver seamless power continuity, reducing data-loss risk.

Manufacturing facilities gain from tailored CITEC – UPS solutions that sustain machinery operations, helping to cut downtime. Telecommunications also requires dependable power systems for industries, where continuous service is vital for maintaining connectivity. Each application receives expert attention, so that the unique specifications of different sectors are adequately met.

What Sets CITEC – UPS Apart

CITEC – UPS products are designed with several key features that drive their robustness and efficiency. These features incorporate advanced UPS technology to guarantee seamless power backup and protection for essential devices.

Advanced Technology and Design

The advanced design of CITEC – UPS includes advanced Digital Signal Processing (DSP) technology that optimizes performance and response time. A broad input window allows these units to handle diverse power conditions, ensuring consistent functionality across different environments.

Users benefit from enhanced support features such as:

  • LCD/LED displays for real-time monitoring, showing crucial information on power status.
  • Remote operation capabilities that facilitate management from afar, enhancing convenience.
  • Optional programmable outlets tailored to specific applications, granting flexibility for diverse needs.

These advanced support features demonstrate the commitment of CITEC – UPS to delivering high-quality, dependable products that cater to the dynamic requirements of users.

How to Choose Your CITEC – UPS

When selecting power solutions, it is essential to analyze various factors to ensure the selected CITEC UPS systems effectively meet your requirements. Sizing correctly sets the foundation for a reliable power backup system.

Key Considerations

The first step in choosing CITEC – UPS is evaluating the power load requirements—quantifying the wattage and voltage consumed by the equipment in question. Next, consider runtime expectations: determining how long you need the UPS to provide power during outages.

Space availability for installation must also be taken into account. Some CITEC UPS models require more room than others, depending on their capacity and design. Understanding the available space helps streamline the selection process.

Beyond technical specifications, assess the type of equipment needing protection. Different industries might have unique demands based on equipment sensitivity and the consequences of power failure. Consulting with CITEC experts can provide insightful guidance, ensuring you assess your organization’s unique needs accurately for optimal UPS system selection.

Installation Made Clear

The CITEC – UPS installation process prioritizes efficiency and safety to deliver optimal performance. Proper planning is key for a successful setup, beginning with a thorough site assessment to evaluate specific requirements. From there, technicians configure the UPS system according to the needs identified, establishing a tailored solution that aligns with the intended application.

Once the configuration is complete, the physical installation of the CITEC – UPS is executed by qualified technicians. Key steps in the installation process include:

  1. Performing a comprehensive site assessment to determine optimal UPS placement.
  2. Configuring the UPS system with appropriate specifications tailored to the environment.
  3. Executing the physical installation, ensuring connections are made securely.
  4. Conducting rigorous tests to verify functionality and performance.
  5. Providing training sessions for end-users to ensure effective utilization of the system.

Following these steps facilitates a smooth and reliable CITEC – UPS installation, ensuring users can depend on their UPS setup for uninterrupted power. The emphasis on thorough training further enhances the value of the installation, equipping users with the knowledge required for optimal performance.

Maintenance that Matters

Maintaining the reliability of CITEC – UPS systems is essential for keeping consistent power backup. Routine CITEC – UPS maintenance supports the longevity and efficiency of these systems. Regular check-ups let you assess battery health, verify firmware updates, and identify potential issues before they escalate. This proactive approach reduces downtime and assures that the UPS operates optimally when needed.

CITEC provides tailored service agreements suited to specific operational needs. Through ongoing support, customers can access expert assistance and guidance to manage their UPS systems effectively. This collaboration helps ensure that all maintenance procedures align with industry standards, enhancing overall performance.

Continuous Support

The benefits of ongoing support from CITEC extend beyond basic maintenance. Dedicated teams are available for technical assistance, providing fast responses to service inquiries. Customers can expect a strategic maintenance schedule, targeted inspections, and timely interventions, reinforcing the integrity of their UPS systems.

This continuous engagement fosters confidence in power backup systems and helps achieve maximum uptime. With appropriate service agreements, CITEC – UPS owners can be confident they are prepared for unexpected power interruptions, protecting vital equipment and data.

Activity Cadence Outcome
Battery Health Assessment Quarterly Verifies reliability and extends life
Firmware Updates When available Enhances performance and security
Visual Inspection Monthly Catches visible issues early
Load Testing Twice per year Confirms the UPS can handle required loads

UPS Repair by CITEC

CITEC recognizes the critical role that uninterruptible power supply (UPS) systems play in maintaining operational continuity. To address technical challenges, CITEC offers comprehensive UPS repair services designed to meet customer needs. A focus on customer satisfaction motivates skilled technicians to provide timely and efficient repairs, minimizing potential downtime.

Restore Performance Quickly

The CITEC – UPS repair services encompass:

  • Identifying issues through effective UPS troubleshooting
  • Replacing damaged components to restore functionality
  • Conducting thorough testing to verify optimal performance

These services help ensure every UPS system is meticulously maintained to avoid future complications. This commitment to excellence in maintenance and repair improves system reliability and extends overall equipment lifespan, allowing businesses to operate without interruption.

CITEC – UPS Batteries Explained

CITEC – UPS batteries are the backbone of the entire uninterruptible power supply system, offering crucial backup power when outages occur. Knowledge about different battery technologies, such as lead-acid and lithium-ion, is necessary for users to make informed decisions. Additionally, regular battery maintenance can significantly affect performance and lifespan, helping ensure optimal operation when it’s most needed.

Battery Technology and Maintenance

In CITEC – UPS systems, technology plays an important role in battery selection. Users should understand the pros and cons of various battery types. Lead-acid batteries are often budget-friendly but need more upkeep. Lithium-ion batteries, while higher cost, typically last longer and require less upkeep.

Effective batteries maintenance includes:

  • Regularly checking charge levels to prevent deep discharges.
  • Cleaning battery terminals to ensure efficient connectivity.
  • Monitoring temperature ranges to avoid overheating.
  • Following recommended replacement schedules to maintain efficiency.

By focusing on both battery technology and proper maintenance practices, users can maximize the reliability of their CITEC – UPS systems and help ensure equipment is always backed by effective power solutions.

Wrapping It Up

In summary, CITEC – UPS stands out as a leader in providing dependable power backup solutions that modern businesses rely on. By prioritizing data protection, equipment safety, and overall operational efficiency, CITEC – UPS systems are engineered to meet the wide demands of various industries. In an era where reliability in power backup is crucial, these systems offer an essential safeguard against unwelcome disruptions.

The robust technology integrated within CITEC – UPS products delivers high performance and longevity, reflecting their commitment to delivering dependable power solutions. Investing in CITEC – UPS not only secures your business’s operations but also improves your overall productivity and peace of mind.

As power reliability continues to be a significant concern, the choice of CITEC – UPS reinforces a proactive approach to managing potential power interruptions. This CITEC – UPS summary illustrates the importance of incorporating these solutions into your infrastructure to navigate the challenges of unexpected power outages seamlessly.

Frequently Asked Questions

What is CITEC – UPS?

CITEC – UPS is a trusted provider of advanced uninterruptible power supply solutions, committed to quality, reliability, and service across various industries to help ensure uninterrupted operations.

How does a UPS work?

UPS systems continuously monitor the main power supply and transfer to their internal battery when an interruption is detected, keeping power flowing and shielding sensitive equipment from data loss and voltage surges.

Why do businesses need CITEC – UPS?

CITEC – UPS systems are vital for maintaining power stability, reducing data-loss and equipment-damage risk, and ensuring operational efficiency across industries such as healthcare, IT, manufacturing, and telecommunications.

What are the key features of CITEC – UPS products?

CITEC – UPS products feature sophisticated Digital Signal Processing (DSP) technology, a broad input voltage range, multiple operating modes, and user-friendly displays that provide real-time status updates and remote operation capabilities.

How do I choose the right CITEC – UPS solution for my needs?

Selecting the right CITEC – UPS involves analyzing factors such as power load requirements, runtime expectations, available installation space, and specific industry applications. CITEC experts can assist in evaluating unique needs.

Installation steps

The installation process includes a site assessment, proper UPS configuration, physical installation by CITEC technicians, secure connections with testing, and comprehensive training for end-users on system utilization.

What role does maintenance play in CITEC – UPS systems?

Routine maintenance is crucial for the longevity and reliability of CITEC – UPS systems, involving regular check-ups, battery health assessments, and firmware updates. CITEC offers tailored maintenance contracts for ongoing support.

What happens when a UPS fails?

CITEC provides specialized repair services where trained technicians quickly diagnose and resolve issues, replace damaged components, troubleshoot, and verify that UPS systems are restored to optimal performance swiftly.

What types of batteries are used in CITEC – UPS systems?

CITEC – UPS systems may utilize various battery technologies, including lead-acid and lithium-ion. Proper maintenance—such as checking charge levels and adhering to replacement schedules—is essential for effective operation.

Sector advantages

CITEC – UPS solutions are customized to meet unique power requirements, providing reliable backup for critical operations—for example, safeguarding medical equipment in healthcare and ensuring uptime for IT systems.

Categories
Shopping

Assembling a Professional-Grade Racking Cane and Auto-Siphon Setup


Complete Homebrew Gear Handbook for 2025

The art of homebrewing is on the rise, with over a million home brewers in the United States alone. To produce premium beer, the right beer brewing equipment is vital.

At Installation Parts Supply, a vast array of specialized beer brewing equipment can be found, suiting both first-timers and seasoned brewers. From simple, small-batch beginner kits to digital, electric assistive systems that can create up to 10 gallons of beer at a time, the right equipment can make a dramatic difference in the brewing process.

Choosing the right kit can be challenging, but with the right advice, brewers can get their brew goals. In this guide, we’ll unpack the must-have products and equipment necessary for home brewing, allowing you to make delicious beer more easily.

Summary Points

  • Understand the essential beer brewing equipment for home brewers.
  • Discover the various types of brewing kits available.
  • Find out how to choose the right equipment for your beer goals.
  • Investigate the cutting-edge developments in brewing technology.
  • See how quality materials and construction affect brewing results.

beer brewing equipment

Perfecting Your Brew with Top Equipment

The basis of superb brewing lies in the grade of the equipment used. At Installation Parts Supply, we offer a curated selection of brewing equipment designed to upgrade your brewing experience.

  • High-grade gear delivers repeatable outcomes batch after batch.
  • Our products are designed to make brewing more accessible and enjoyable.

By investing in premium gear, you’ll enjoy tighter heat regulation, improved grain efficiency, and enhanced beer character.

Understanding Beer Brewing Equipment Basics

The secret of winning home brewing lies in knowing the basics of beer brewing equipment. Every effective home brewing setup requires several essential components that work together to transform raw ingredients into mouth-watering beer.

Essential Components for Home Brewing

The brewing process typically involves equipment for mashing, boiling, cooling, yeasting, and conditioning. Quality equipment is pivotal for crafting high-quality brews. A stainless stainless steel kettle is a foundational component, serving as an ideal vessel for boiling wort and hop additions.

Material Considerations: Stainless Steel vs. Alternatives

Stainless steel has emerged as the premium choice for brewing equipment due to its robustness and low-maintenance nature. Other materials like aluminum or copper may be cheaper but come with trade-offs in terms of service life and care. Installation Parts Supply supplies a range of conical fermenter options, stressing the significance of material choice in brewing equipment.

Conical fermenters offer a major upgrade from basic fermentation vessels, allowing for hassle-free separation of beer from sediment. Temperature control systems are also essential, ensuring optimal conditions during fermentation, which markedly influences the final flavor profile of the beer.

Entry-Level Kits for New Brewers

Beginning a home brewing journey demands the right equipment, and beginner brewing kits are the best starting point. These kits offer everything needed to brew a tasty batch of beer and are ideal for those fresh to brewing.

Compact One-Gallon Packages

Installation Parts Supply provides full 1-gallon starter systems that are perfect for beer lovers who want to get started without a major expense. These small-footprint brewing kits are suited for small-space residents or those with limited space.

Starter Kit Contents Explained

Beginner kits usually feature essential tools like a fermentation vessel, airlock, thermometer, siphon, sanitizer, and bottling tools—everything required to finish the entire brewing process from start to finish. Carefully portioned ingredients, including hops, grains, and yeast, are also provided to ensure a flawless first batch.

Intermediate Brewing Systems from Installation Parts Supply

Push your skills further with intermediate brewing systems from Installation Parts Supply. These systems are designed for brewers who have conquered the basics and are ready to increase their batch sizes and brewing capabilities.

Five-Gal Kitchen Boilers

The 5-gallon stovetop brewing kettles are a common choice among home brewers, supplying enough volume to craft approximately two cases of beer per batch while fitting on most household ranges. These stainless steel kettles boast triple-layered bottoms for consistent warmth and scorch prevention.

10-Gallon Propane-Heated Systems

For bigger brews, the 10-gallon propane-heated systems offer significant capacity increases and take the operation al fresco. These systems feature a stainless steel grain and hop basket, empowering brewers to craft all-grain recipes with ease.

Next-Gen Electric Brewing

Explore the pinnacle of home brewing technology with Installation Parts Supply’s advanced electric brewing systems. These systems are crafted to offer brewers with pinpoint thermal regulation, hands-off steps, and commercial-grade construction, fitting for both home brewers and nano-breweries.

10g Plug-In BIAB Kits

The 10-gallon electric BIAB (Brew In A Bag) systems ease the brewing process while keeping complete control over every variable that affects beer quality. These systems contain programmable controllers that can maintain precise mash temperatures within 1 °F, allowing for complex step-mashing profiles.

Large-Scale 20g Kits

For serious homebrewers or taproom labs, the 20-gallon systems provide production-scale capacity with the same fine-tuned regulation and ease of use as their little siblings. These systems are fitted with fast plate coolers and heavy-duty hot-liquid pumps, facilitating smooth transfers and looping during mashing.

Installation Parts Supply’s advanced electric brewing systems remove the need for propane burners, adding safety indoors and more environmentally friendly. The heavy-gauge steel body ensures these systems will endure years of routine use, establishing long-term value for committed hobbyists.

Fermenting Essentials

The heart of the brewing process lies in fermentation equipment, where wort is converted into beer over several days or weeks.

Fermentation equipment is integral for brewers, as it strongly affects the grade of the final product. Installation Parts Supply supplies premium conical fermenters in multiple sizes.

Benefits of Conicals

Conical fermenters feature a sloped bottom that gathers yeast and other particulates, allowing quick sediment discharge without disturbing the clarified brew above.

Temperature Control Solutions

Temperature control during fermentation is essential for flavor development, and Installation Parts Supply’s jacketed fermenters offer exact temperature control.

High-end fermentation systems, such as the BrewBuilt X2 Jacketed Conical Fermenter (7 gal.), include features like sampling ports and pressure-capable designs, signifying the front line of home brewing technology.

By choosing quality fermentation equipment from Installation Parts Supply, brewers can ensure batch-to-batch reliability, cut raw-material expenses, and craft clearer, more stable beer.

Essential Accessories for Quality Brewing

Brewing excellent beer calls for not just the right equipment, but also the right accessories. At Installation Parts Supply, we offer a broad range of products made to refine brewing workflow, consistency, and outcome.

Liquid Transfer Solutions

High-quality pumps are essential for high-level setups, allowing the transfer of hot wort between vessels while maintaining temperature and cutting O2 exposure. Installation Parts Supply’s variable speed brewery pumps, like the MB® Variable Speed Brewery Pump, incorporate SS housings and hefty engines that push 13.2 gallons per minute.

Cool-Down Solutions

Quick wort chillers are essential for great flavor, as fast temperature drop locks in volatile oils and minimizes bacterial growth. Our plate chillers leverage contra-flow designs to cool boiling wort to pitching temperatures in minutes.

Supplemental key add-ons include silicone hose transfer kits with valves, temperature management tools like digital controllers and thermowells, and brew-safe detergents and sterilizers. Measurement tools such as refractometers and pH meters allow brewers to make data-driven decisions, producing more uniform outcomes.

By adding these accessories into your brewing setup, you can significantly enhance your brewing throughput and produce commercial-quality beer with repeatable results.

Measuring and Testing Equipment

For brewers pushing boundaries, measuring and testing equipment is critical. Precise measurement and testing equipment from Installation Parts Supply empowers brewers to reach steady outcomes by eliminating guesswork from the brewing process.

Exact Instruments for Better Beer

Digital thermometers with stainless steel probes deliver accurate temperature readings during each step. Hydrometers and refractometers let brewers to measure the specific gravity of their wort and beer, figuring ABV and watching gravity changes.

Programmable Brew Management

Installation Parts Supply offers high-tech digital controllers that can coordinate temperature ramps, holds, and cooling cycles. These controllers improve consistency between batches and reduce babysitting.

Other essential tools include pH meters, water testing kits, dissolved oxygen meters, flow meters, and pressure gauges. These tools enable brewers in holding optimal conditions during brewing, fermentation, and packaging, ultimately resulting in better beer quality.

The integration of digital controllers with multiple hardware pieces yields part-auto setups that combine the hands-on artistry with the exactitude of pro breweries.

Bottling and Packaging Solutions

For home brewers, the right bottling and packaging solutions can make all the difference in their final product. Installation Parts Supply offers complete bottling and packaging solutions that help preserve the quality of your homebrew and boost shelf appeal.

Manual & Bench Cappers

Bottle cappers vary from simple hand-operated models great for small batches to bench cappers that provide leverage advantages for larger bottling runs, lessening effort and ensuring consistent seals. High-quality crown caps with oxygen-absorbing liners reduce O2 ingress, preserving the fresh flavors of your beer over time and extending its shelf life.

Kegging Systems for Home Brewers

For brewers wanting draft at home, Installation Parts Supply offers complete kegging systems that streamline the finish while delivering the authentic draft experience for your homebrew. Cornelius (Corny) kegs in 2.5 and 5-gallon sizes provide the best option for home brewers, blending simple sanitation, pressure capability, and fit with common taps.

CO₂ regulators, gas tanks, and dispensing equipment are sold in sets, equipping brewers everything needed to condition and dispense their beer with professional results. Transfer equipment made for closed transfers protects fragrant oils and prevent oxidation during the critical transfer from fermenter to bottle or keg.

Bottle fillers with counter-pressure capabilities allow for packaging beer with existing carbonation, removing extra fermentation steps and keeping bottles clear. Installation Parts Supply keeps ample inventory of both standard amber 12 oz bottles and custom shapes for those looking to create a distinctive presentation for their homebrew.

Kegging systems dramatically slash packaging time compared to bottling, letting brewers to package a 5-gallon batch in minutes rather than the hour or more spent on bottle prep, fill, and seal.

Picking Gear That Fits your Needs

Choosing the right beer brewing equipment is essential for producing top-notch brews. Whether you’re a seasoned brewer or a beginner, investing in the right equipment can make a notable difference in your brewing experience.

Matching Equipment to Your Experience Level

First-timers should start with a simple brewing kit that bundles core parts, while advanced hobbyists can swap out selected hardware such as fermentation temperature controllers to boost their brewing process.

Cost vs Quality Decisions

When choosing beer brewing equipment, look at both the upfront price and ongoing worth. Stainless steel equipment may be more expensive upfront but offers durability and ease of cleaning, yielding strong ROI for dedicated hobbyists.

At Installation Parts Supply, brewers can choose a variety of equipment to fit their requirements, from beginner-friendly kits to high-tech rigs. By evaluating factors such as experience level, budget, and brewing goals, brewers can pick the perfect tools when buying their equipment.

Wrap-Up: Raise Your Brew Game with IPS

Installation Parts Supply is your one-stop shop for all your beer brewing equipment needs, from starter packages to advanced systems.

Our complete selection evolves with your skills and ambitions, ensuring you have the right tools for steady, pub-level performance.

With a dedication to top standards and a expert support available for guidance, we back your home brewing goals. Check us out or talk to our experts today to enhance your brewing experience.

Categories
Shopping

How to Test Your Angle Stop Valve for Proper Function

Order Chrome Compression Angle-Stop Valves Instantly

Did you ever consider in what way a compact plumbing component blocks pricey flooding? Quality fixtures ensure success, and Installation Parts Supply provides trade-quality solutions you can trust. Their range includes durable , top-performing 1/2 x 3/8 compression angle stop choices designed for reliability.

Regarding protecting your supply network, shortcuts won’t do. The BrassCraft CS40X-C model, for instance, combines modern styling with ADA compliance, ideal for both homes and businesses. Plus, buying through the web gets you rapid dispatch to your home.

Why gamble with leaks or breakdowns? Choosing premium parts ensures long-term efficiency and peace of mind. For upgrades or repairs, Installation Parts Supply offers the parts you need effortlessly.

Fafa73Da 36Bd 4Bf8 9758 2D81D92842F8

Notable Observations

  • Installation Parts Supply offers dependable, trade-quality plumbing parts
  • Web purchases provide fast, coast-to-coast delivery
  • CS40X-C by BrassCraft offers a ½” FIP × 3/8″ compression configuration
  • ADA-approved stop valves fit homes and businesses
  • Premium construction resists seepage and boosts longevity

Overview of Chrome Compression Angle-Stop Valves

A tiny powerhouse of a valve protects and controls your water flow. They channel water to fixtures like sinks, toilets, and appliances without leaks, ensuring no unexpected drips disrupt your day.

Its right-angle form hugs walls to save room and simplify plumbing. Over straight valves, the angled design wins in cramped areas while maintaining full functionality.

  • Engineered for longevity: Brass body withstands wear; chrome coating provides shine and corrosion defense.
  • Potable water–rated: NSF approval ensures compliance with drinking-water safety.
  • Space-smart:

BrassCraft’s valve provides exact adjustment via its ½” FIP × 3/8″ compression port. Whether you’re a DIYer or a pro, this design balances ease of use with professional-grade reliability.

Valve Highlights

These vital fixtures unite strength and style. Engineered for constant use, they bring both hardiness and a refined look.

One-Piece Brass Design

Brass main body prevents splits and seepage. It tolerates PSI spikes and heat changes—perfect for heavy-use homes.

  • Rust-proof: Fights oxidation even in wet conditions.
  • Seamless design: Continuous brass body avoids joint vulnerabilities.

Fine-Tuning Flow with Multi-Turn Action

Gradual turns stop pressure spikes. The multi-turn handle lets you fine-tune pressure for appliances like dishwashers or faucets.

Sleek Chrome Plating on Brass

The chrome coating delivers long-lasting luster. The finish wipes clean of smudges and blends with contemporary decor.

  • Low-maintenance: Quick-wipe surface stays clear.
  • Matching trim plates: Create a coordinated look with exposed piping.

Where to Use Angle-Stop Valves

A successful upgrade depends on selecting the correct fixtures—where do these fit? These fixtures excel in both homes and commercial settings, offering precision control where it matters most.

Residential Plumbing Fixtures

From sinks to toilets, these valves ensure leak-free connections. Their compact design tucks under counters, while the 2.2 GPM flow rate meets everyday usage.

  • Kitchen safety: NSF-rated for tap water—health guaranteed.
  • Easy upgrades: Fits standard 1/2-inch supply lines—no special tools needed.

Safe-Water Installations

Built for drinking-water systems, they comply with rigorous standards. The lead-free brass construction ensures purity, and backflow protection secures your supply.

Application Key Benefit Note
Residential sinks Space-saving 90° angle Max 60 PSI pressure
Drinking water lines NSF-certified materials Avoid recirculating hot water

With BrassCraft’s ½” fittings, strength and standards align. Be it repairs or new builds, they maintain flawless flow.

Technical Specifications and Ratings

Reviewing the ratings guides you to the ideal fixture. These products adhere to tight criteria without sacrificing simplicity.

Port Dimensions: 1/2″ FIP × 3/8″ Compression

The 1/2-inch female iron pipe (FIP) inlet pairs with a 3/8-inch compression outlet. Typical domestic fixtures link directly.

Temp & PSI Limits

Rated for 150 PSI and 180°F, these components handle daily demands. The ball-style handle ensures smooth operation even under high pressure.

Regulatory Compliance

Items are tested to key performance codes. Each unit is part of the Series-tested for quality and reliability.

Certification Purpose Relevance
ASSE 1016 Performance standards Ensures leak-free operation
NSF 61 Drinking water safety Lead-free materials
CSA B125 Plumbing code compliance Meets US/Canada regulations
  • UPC 026613165912: Eases replacement orders and stock management.
  • Lifetime limited warranty: Covers defects for peace of mind.
  • Made in USA: Backs American workmanship and standards.
  • Replacement parts: Readily available for repairs.

Valve Advantages

What sets these fixtures apart in toughness and user-friendliness? Our valves combine rugged construction with user-friendly features, ensuring years of trouble-free performance. All aspects, from metal grade to form, focus on your confidence.

Built to Last

Constructed for endurance, they pair brass internals with a protective chrome layer. The included rubber washer and compression sleeve keep drips at bay despite constant use.

  • Pressure-tested: Withstands 150 PSI securely.
  • Non-lead construction: Certified lead-free for health safety.
  • Accessibility-rated: Complies with ADA for universal usability.

Easy Installation and Maintenance

Amateurs and experts alike enjoy easy fitting. The multi-turn handle offers precise control, while the compression fitting ensures a snug connection.

Tools you’ll need:

  • Adjustable wrench
  • Teflon tape (for threaded joints)

Pro tips:

  • Check for leaks by running a dry paper towel along connections.
  • Check and renew washers yearly if worn.
  • Gently warm fittings to ease stuck joints.

Purchase Steps

Selecting your valves is easy—just follow these steps. Our online store is designed for quick browsing, secure checkout, and fast shipping across the U.S..

How to Buy Online

Begin with choosing your valve. Use filters—size, metal, PEX fit, etc.—to focus results. Place products in your basket and complete payment.

Assistance needed? Our customer support team is available via chat or phone. They can verify details (e.g., weight) so you order correctly.

Fulfillment & Help

Your order ships through FedEx or UPS with full traceability. Choose:

  • Standard: 3–5 business days (free on orders over $50)
  • Expedited: 1–2 day rush delivery for tight timelines

Changed your mind? Returns are accepted within 30 days. Contractors get volume discounts—ask about bulk pricing. Local pickup is also available in select cities.

Wrapping It Up

Upgrade your plumbing with confidence using reliable, code-compliant parts. The right angle stop valve delivers drip-proof service, thanks to brass core and glossy chrome layer.

Installation Parts Supply provides professional solutions—valves, trim plates, hoses alike. Seeking assistance? Our team offers free consultations to streamline your project.

Prepared to upgrade? Call (800) 555-1234 or shop online today. Rely on specialists—where excellence meets assurance.